Before You Begin
I don’t always tell you to backtack when beginning and ending sewing in these instructions. I didn’t feel it neccessary, it’s a given. In the illustrations, sometimes stitching will be marked in red, this is so you can see it better, doesn’t mean to use red thread. 😀 Red lines are tailor chalk lines. These are just the sewing instructions for the VR pants.
You can break out of this blog entry and print these instructions by clicking here.
Use an all purpose thread with a 12/80 sewing machine needle. Stitch length is set to 2.5 mm unless I state otherwise.
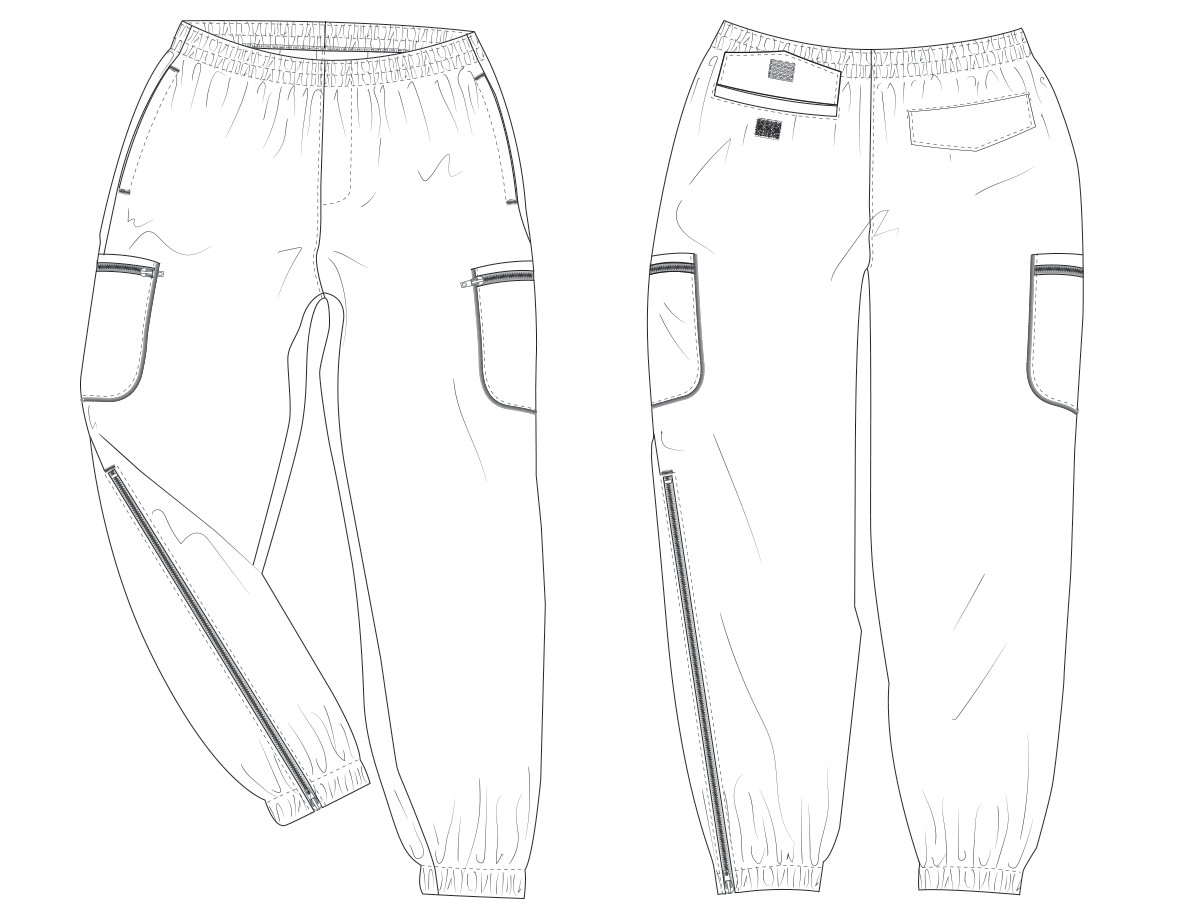
Constructing the Back Panels
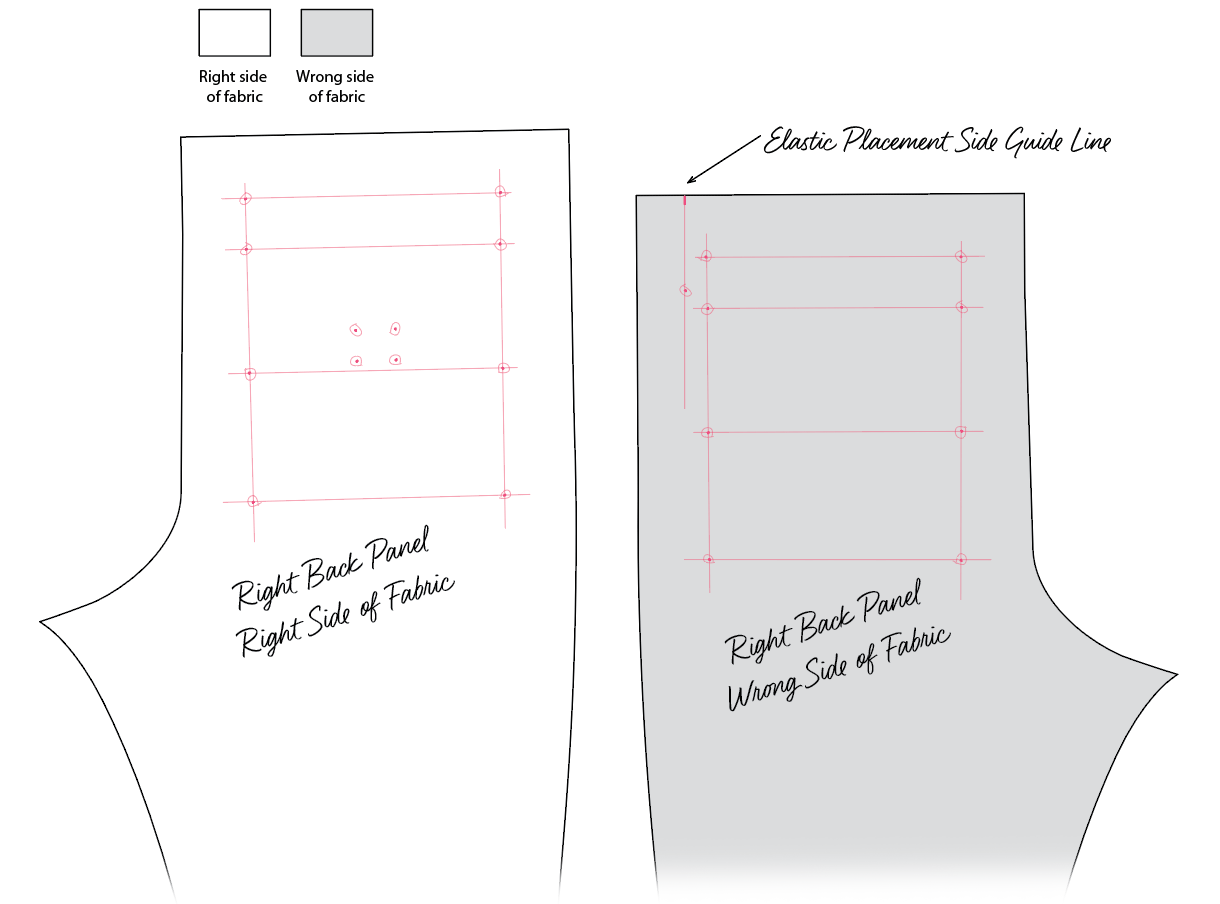
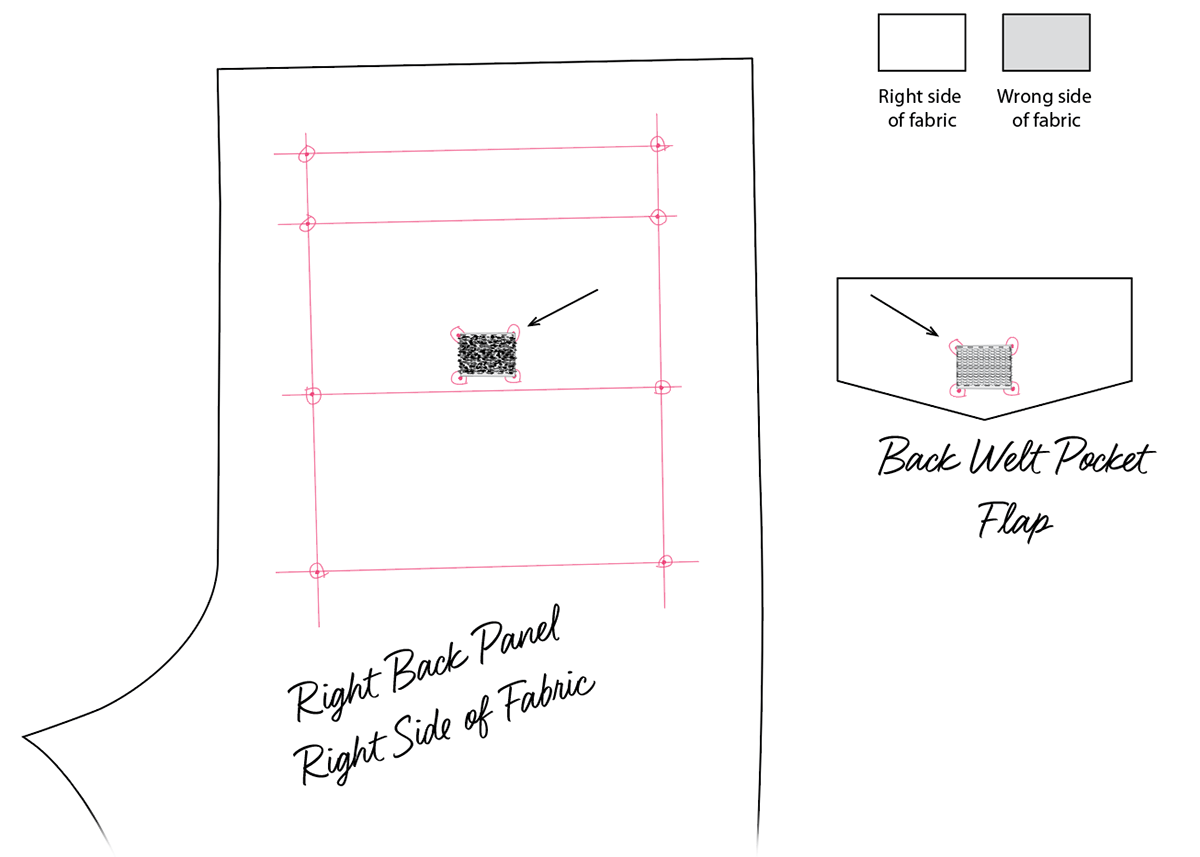
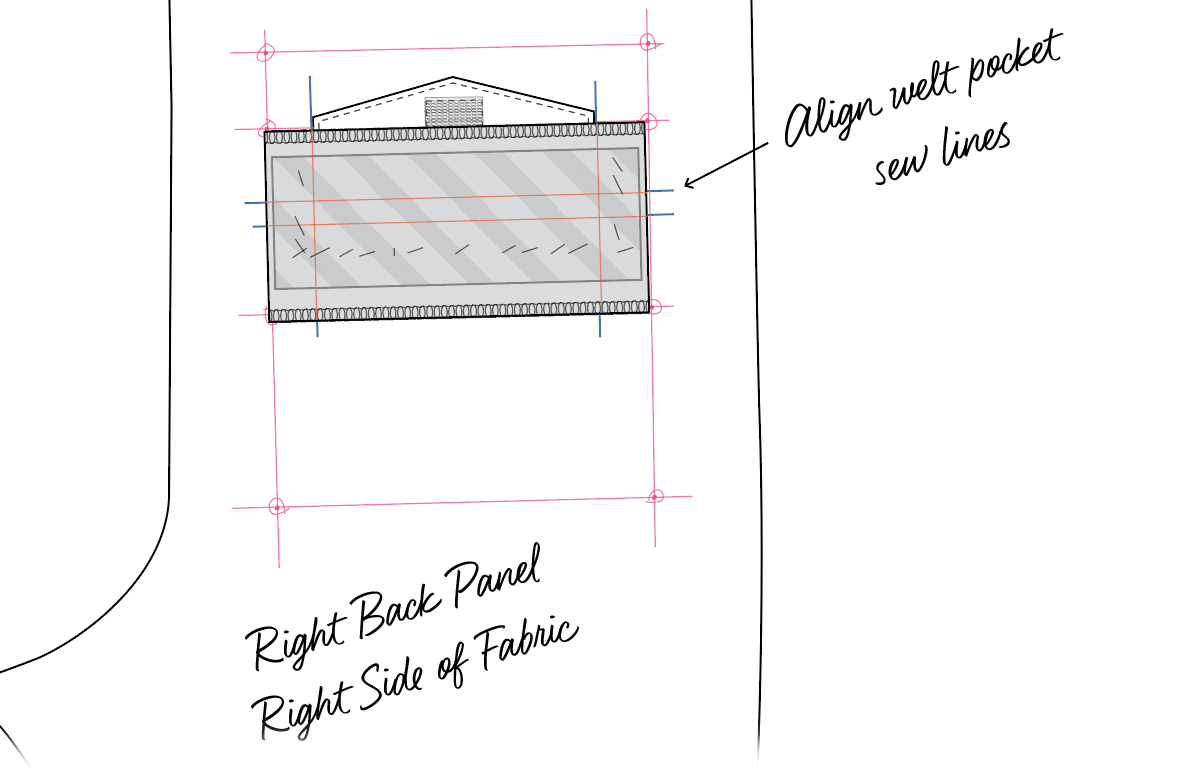
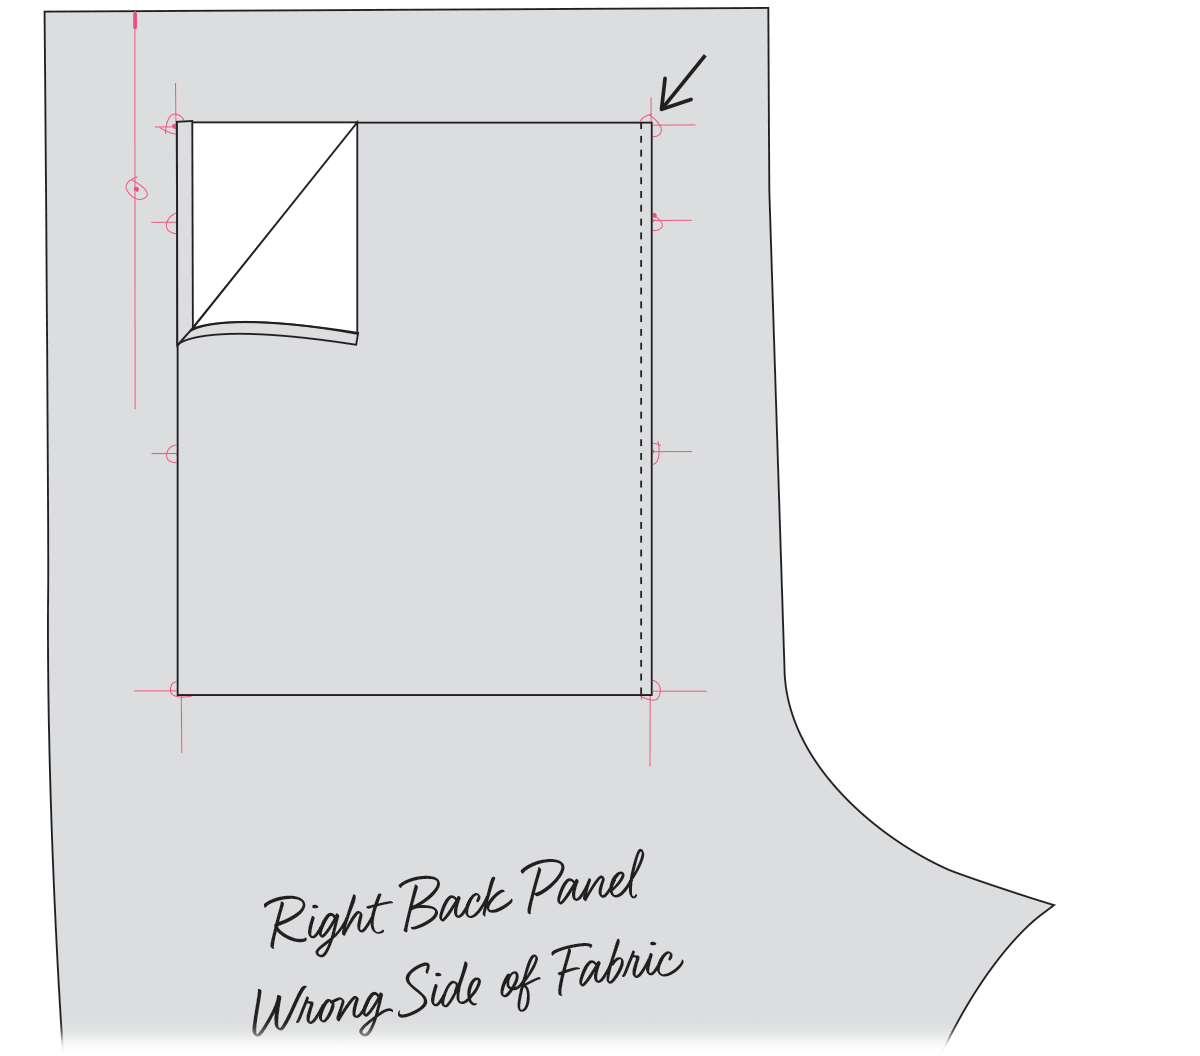
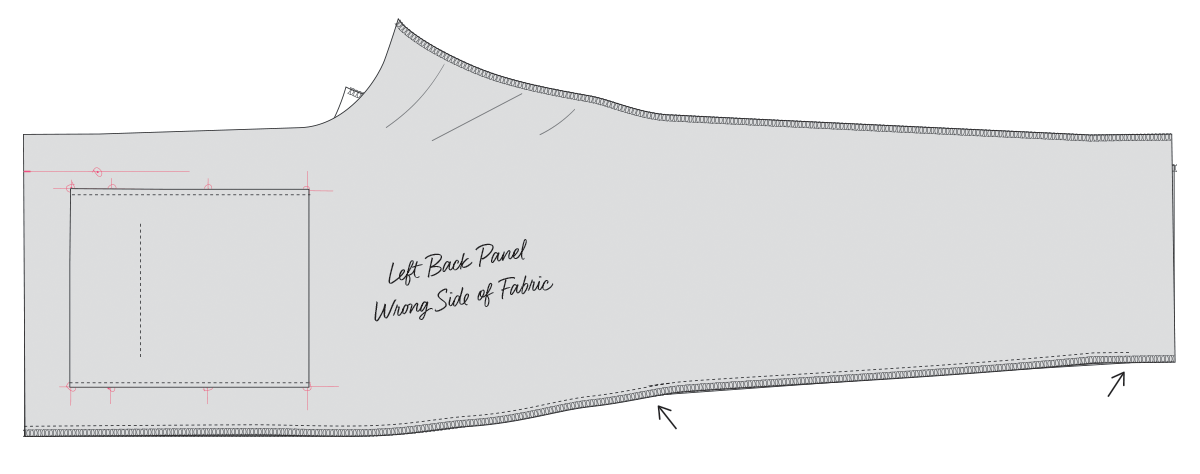
With a tailor’s chalk pencil and ruler, connect the dots you marked from the pattern, on both the right and wrong sides of each, the right and left back panels, squaring lines, extending past so you can see where to place the pocket bag and welt pieces. And connecting the line on the wrong side, where there is a notch at the top and mark hole for the elastic placement, like the picture above.
Let me explain what these lines are. The two vertical lines are where the back pocket bag sides end. The first horizontal line at the top is where the top of the back pocket bag ends. The last horizontal line is the bottom of the back pocket bag when the pocket bag is folded. The other two horizontal lines in between are showing where to place the back welt pocket piece.
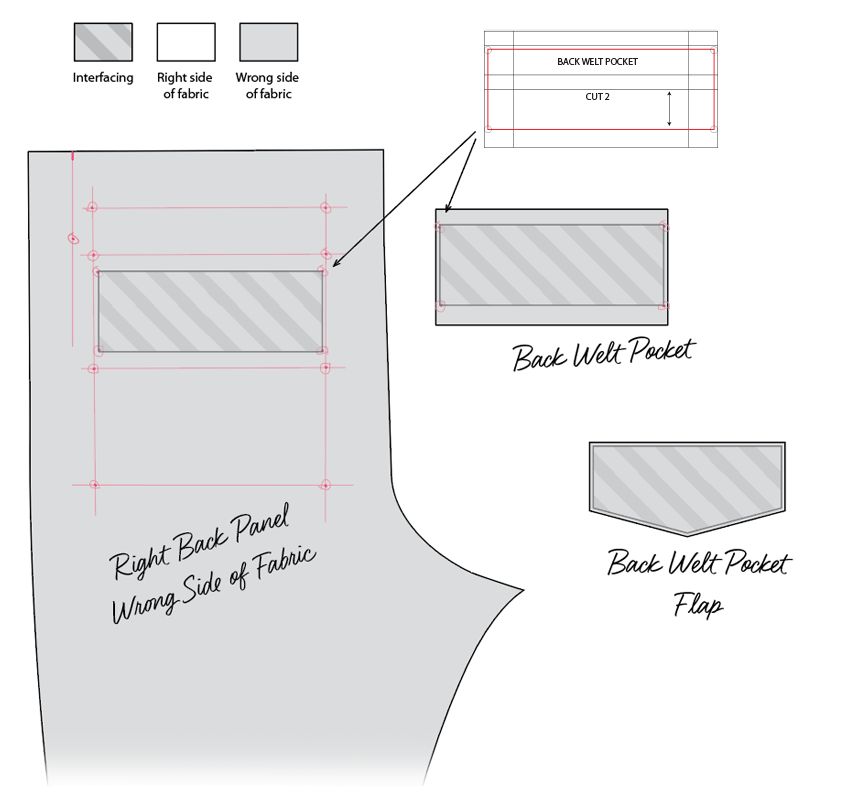
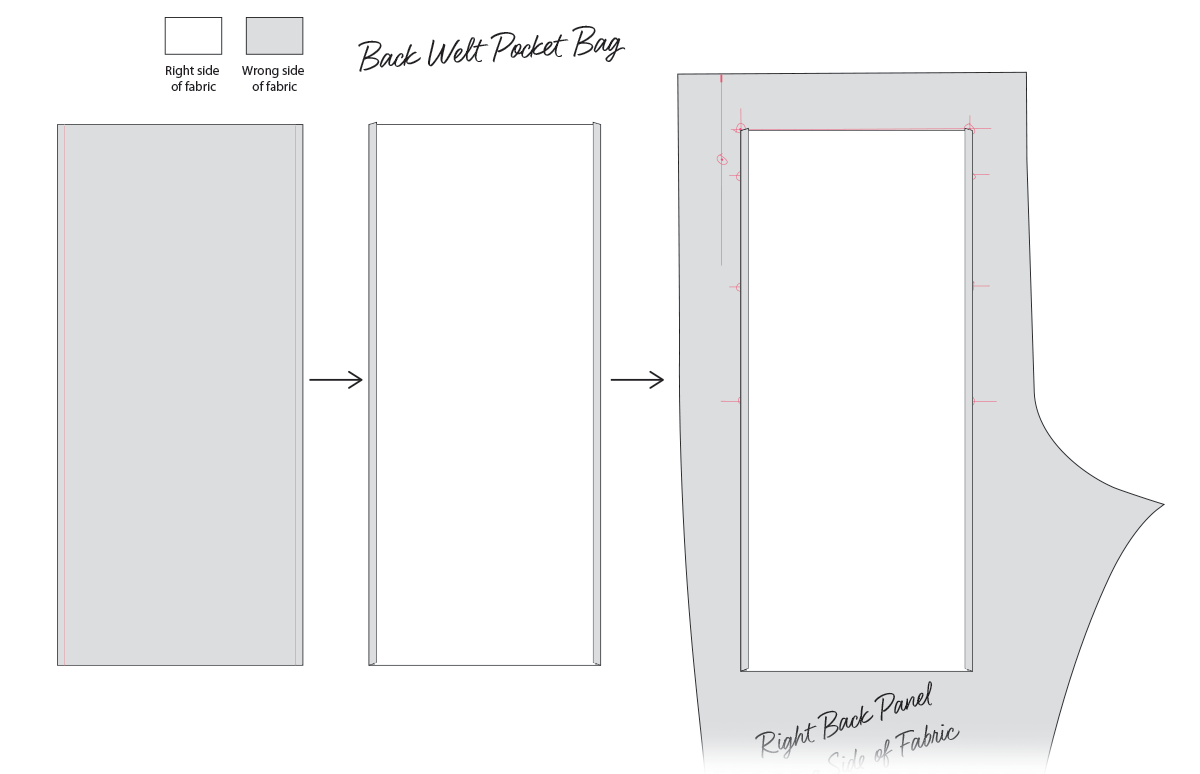
Use back welt pocket pattern piece to mark where to place the interfacing on underside of back panels and the back welt pocket pieces themselves. Place interfacing down on the wrong side of the two pieces of the pocket flaps marked for velcro, wrong side of back welt pocket pieces and wrong side of back panels and iron in place. Remember if you are working with synthetic fabric to use the right iron setting. It’s also a good idea to lay a silicon ironing sheet on top so the iron doesn’t come in direct contact with the interfacing and get gummed up.
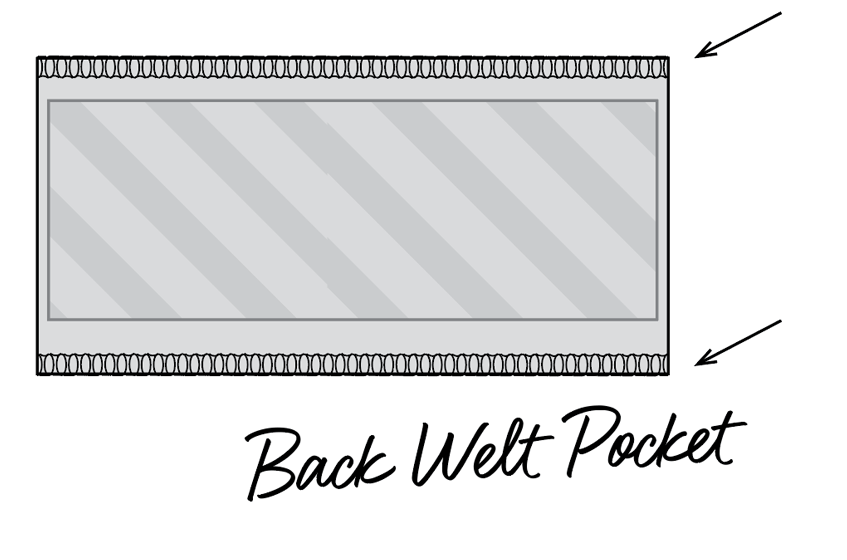
Overlock or zigzag top and bottom edge of back welt pocket piece.
Cut velcro pieces. Use 1 inch (2.5 cm) velcro, and cut to 1.25″ (3 cm) in length, 2 hook and loop sets. Sew velcro on flaps and left and right back panel pieces, sewing 1/16 (1.6 mm) around all 4 edges of the velcro. To prevent it from sliding around while I’m sewing it down I stick a piece of wash away double sided seam tape on the back.
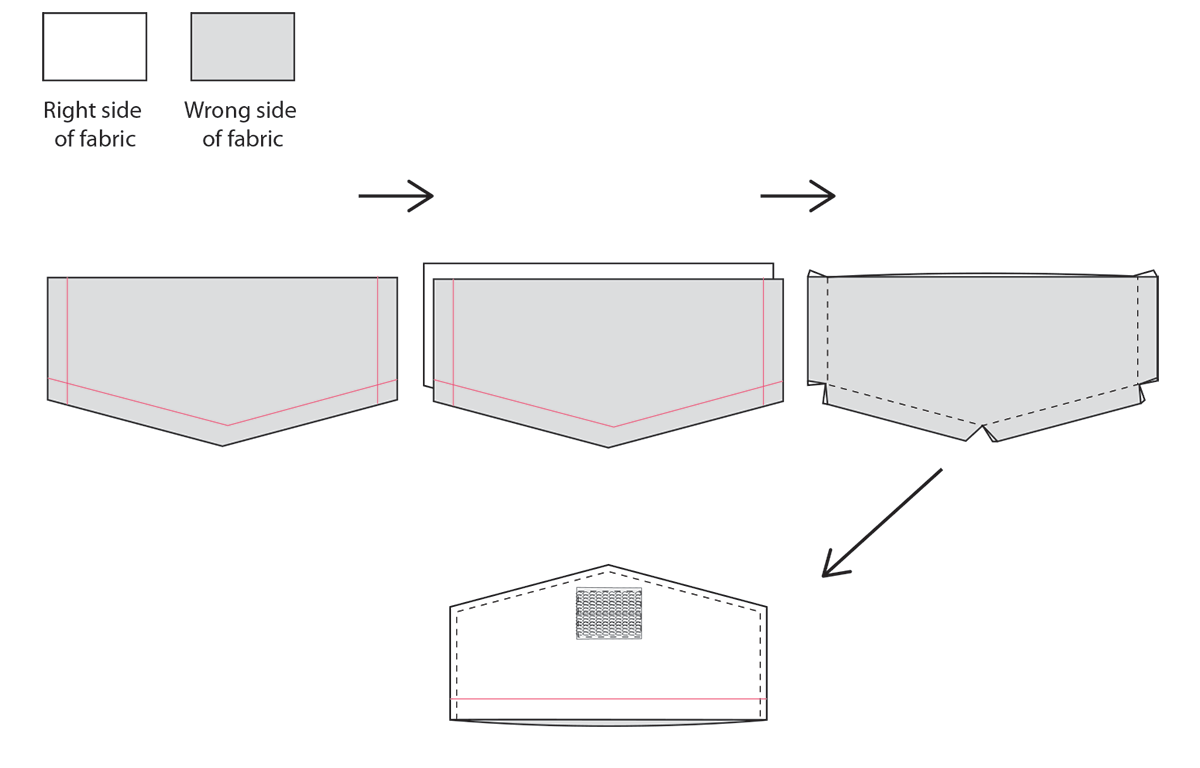
Mark 3/8 inch (1 cm) seam allowance on back pocket flap piece without the velcro on wrong side of fabric. With right sides together, sew flap pieces together, leaving top open. Snip Corners.Press seams open on flap. Turn and use bone folder to turn out corners. Press flat with iron. Top stitch around flap, 1/8 inch (3.175 mm) from edge. On the side with the velcro, mark 3/8 inch (1 cm)seam allowance on open top.
Measure the width of the pocket flaps and make sure they came out 6 inches (15 cm). This is important. They have to be the same width as the welt opening. If not, go back and readjust the width.
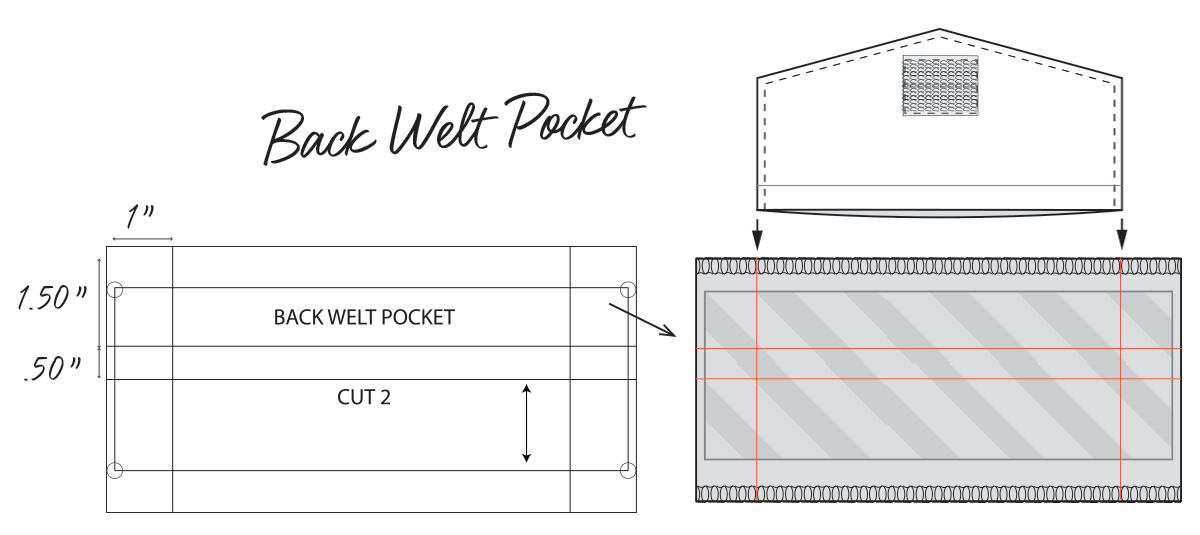
With a tailor’s chalk pencil and a c-thru ruler copy sew lines as they are on back welt pocket pattern. Draw them on the side that has the interfacing on it. Horizontal lines start 1.50 inches (3.8 cm) from top, then .50 inch (1.3 cm) down from that line. Then 1 inch (2.5 cm) vertical lines from sides.
Check the flap and see if it fits inside those vertical lines perfectly. You want the flap and those lines to be the same size. The flap and the welt opening should be 6 inches (15 cm). If you see it’s not, go back and rectify this before you can’t turn back.
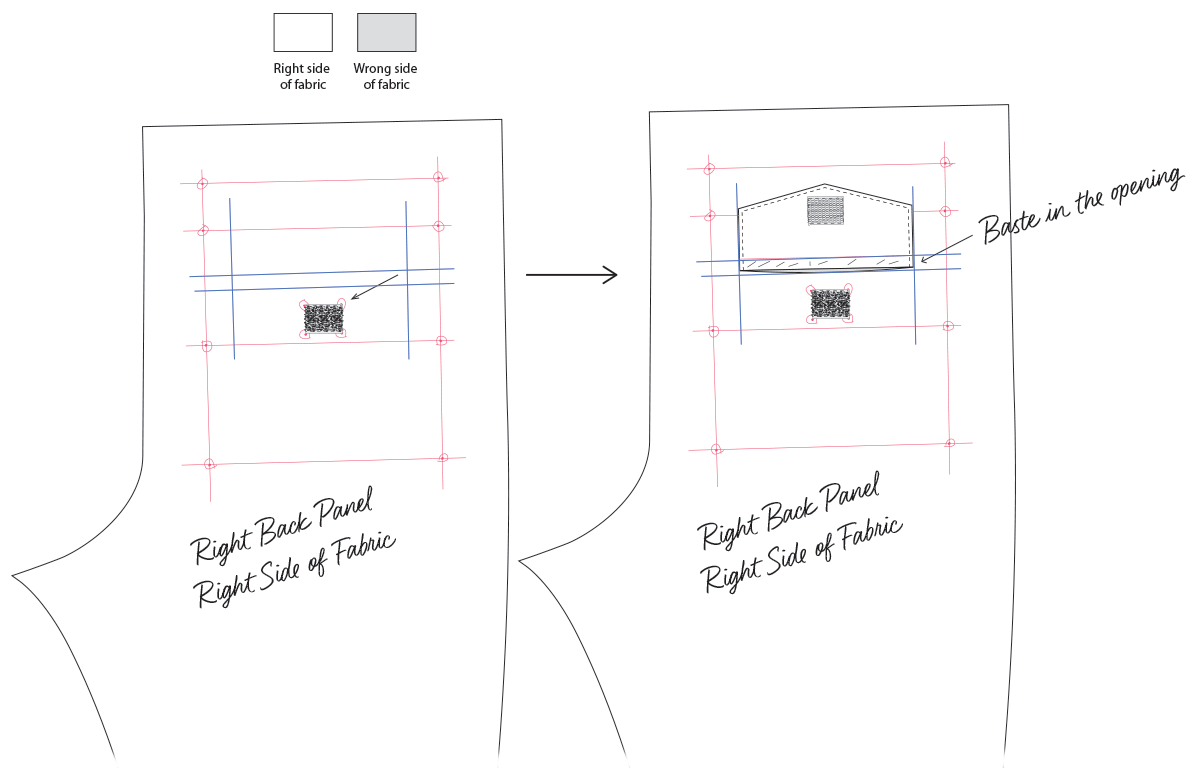
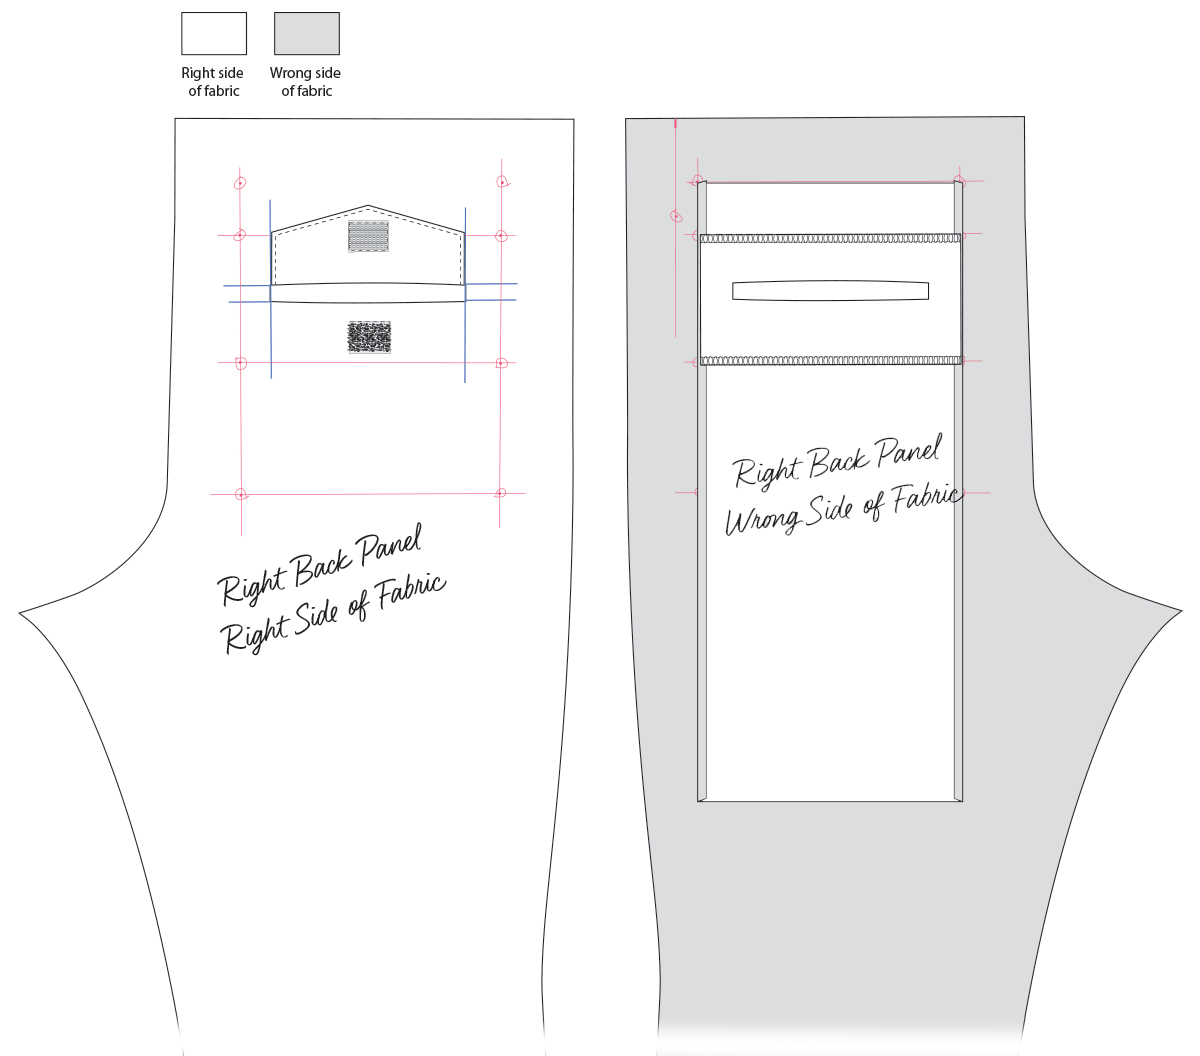
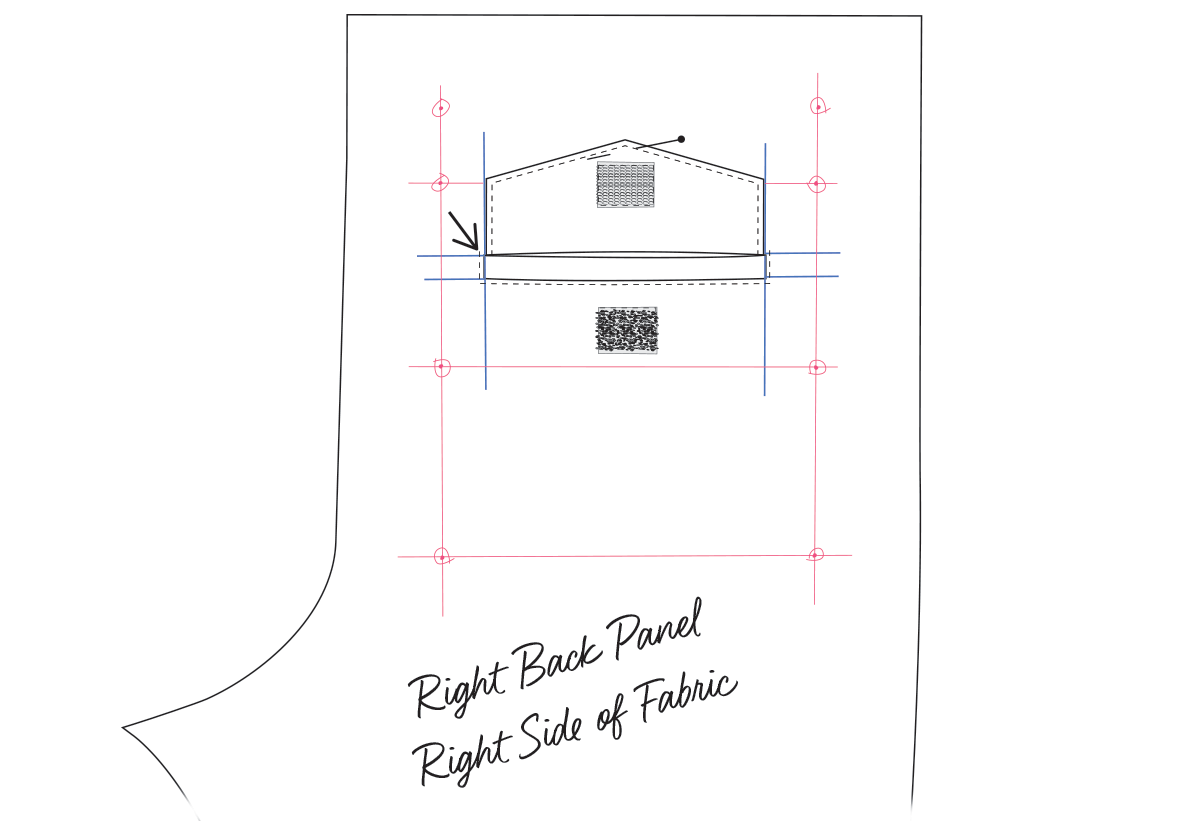
Mark same markings on right side of both left and right back panels (velcro side) to know where to position the flaps, extending the lines past the other lines you marked previously. I have the lines drawn in blue in the diagram above so it’s less confusing.
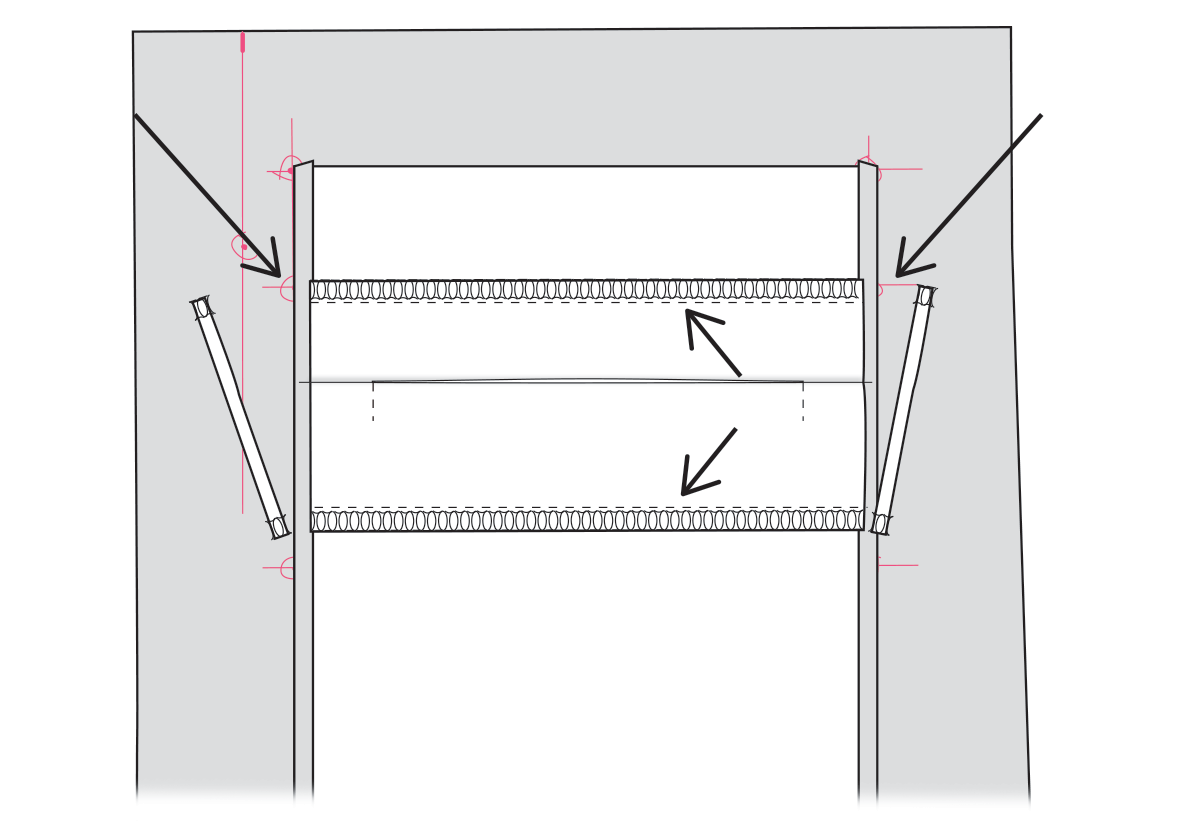
With flap velcro side up, line up flap’s raw opening seam allowance line with the top parrelell line of the welt opening. As shown above. Baste flap in place with basting thread by hand where the opening of the welt will be.
Position welt pocket piece, interfacing/marked side up, lining up with the indentical sew lines on the back panel, as seen in the diagram. Baste this in place on sides and bottom with basting thread by hand as well.
Prepare the back pocket bags. On right side of fabric mark .25 inch (6 mm) seam allowance on each side.
Turn over to wrong side and fold up seam allowance and iron.
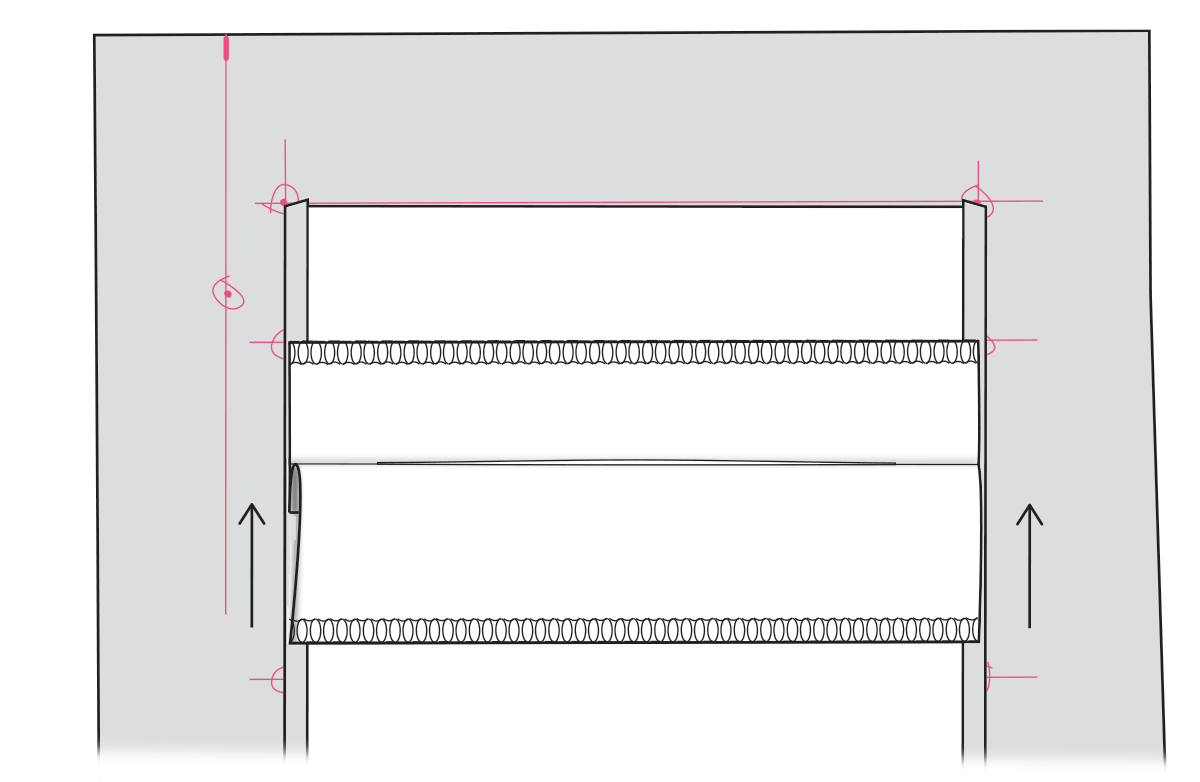
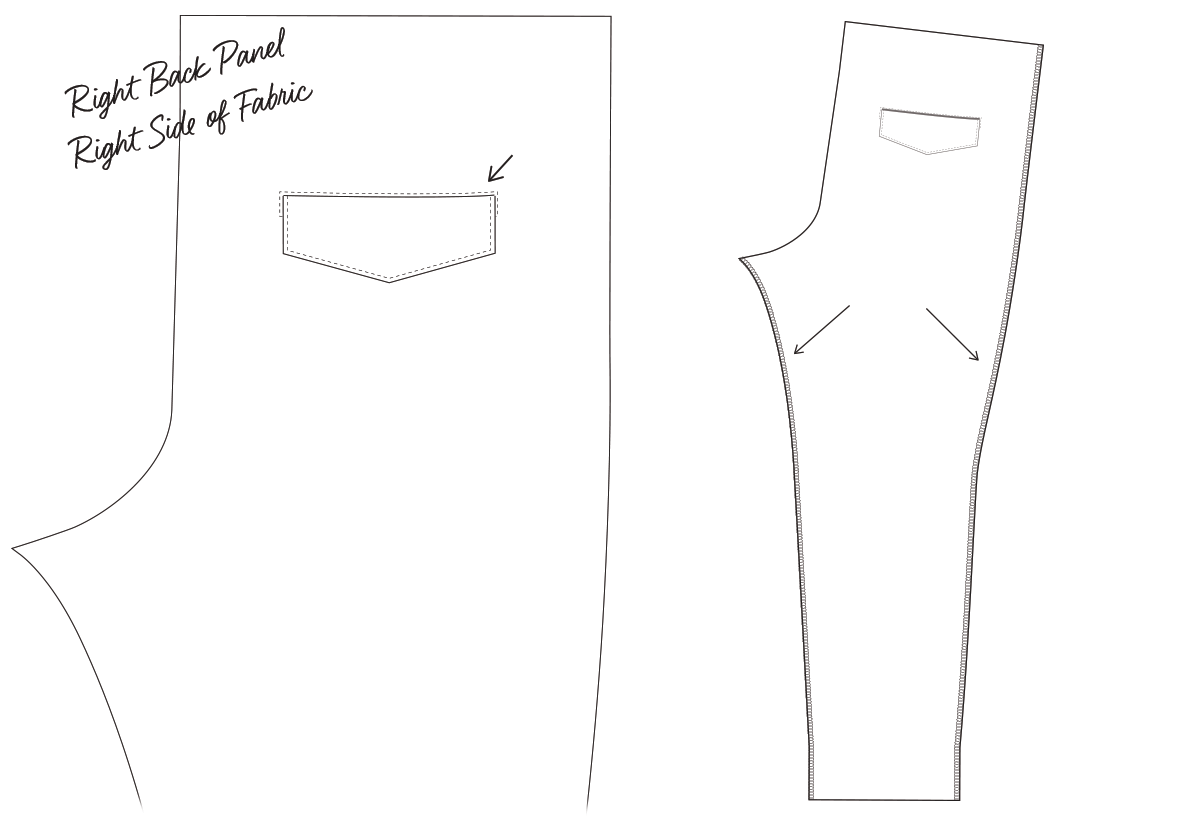
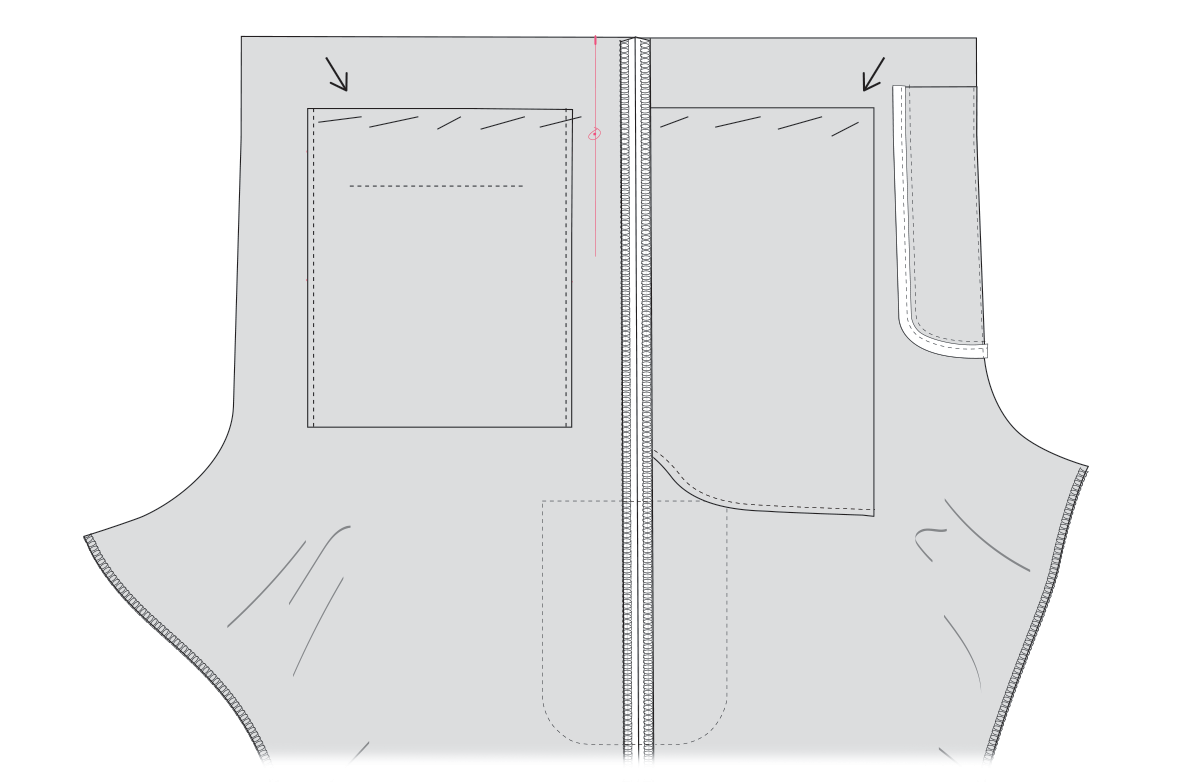
Turn back panels over and position pocket bag on the underside, making sure it’s in line with the first horizontal line at the top and the side vertical lines. Tape in place with painters tape or pin in place. However, don’t put pins or tape near where the sew lines are.

Turn back panels back over and sew on parelell lines, making sure to stop and start exactly at vertical lines, back tacking on both sides as shown in the diagram above. I like to sew with a smaller stitch length when I’m doing this part, around 1 mm to 1.50 mm. A smaller stitch helps to get better accuracy.
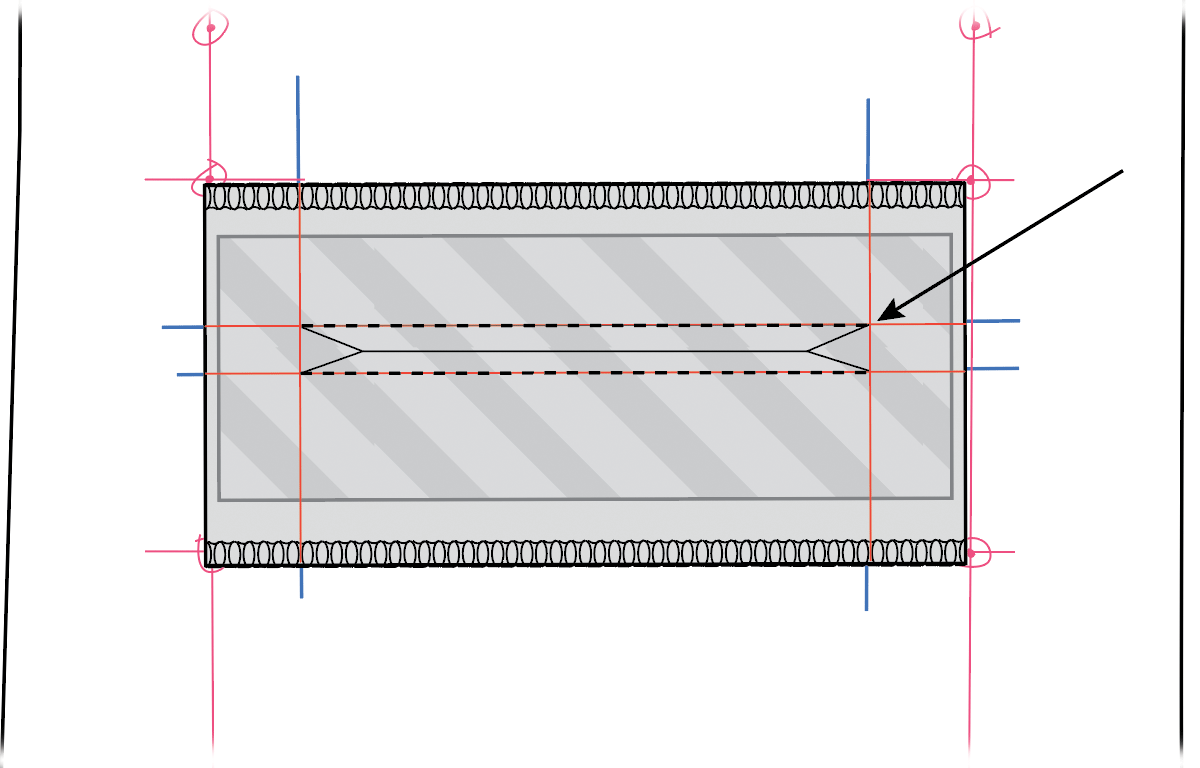
Cut the welt opening. Start in the center (cutting through all the layers) and stop about 3/4 inch (2 cm) at the end and cut a Y into the ends, getting as close to the ends of the sew lines as you can, applique scissors work best for this part. Those triangles will be used to seal up the sides of the welt opening.
Remove basting and flap excess from flap end that was cut away when you cut the welt opening.
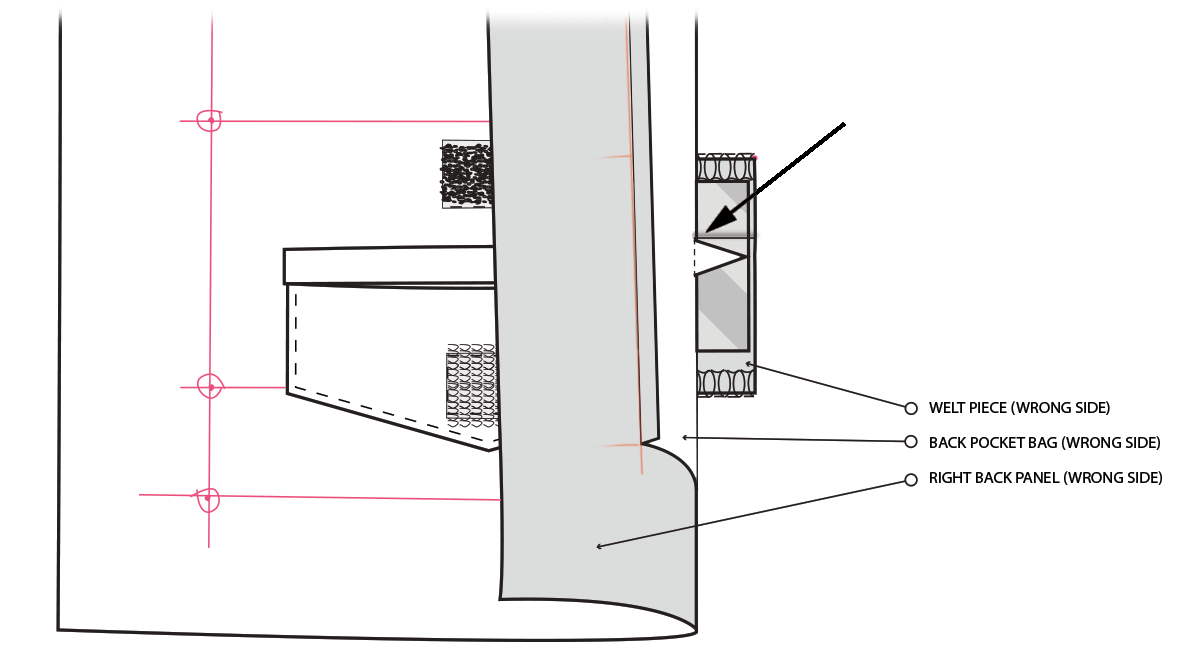
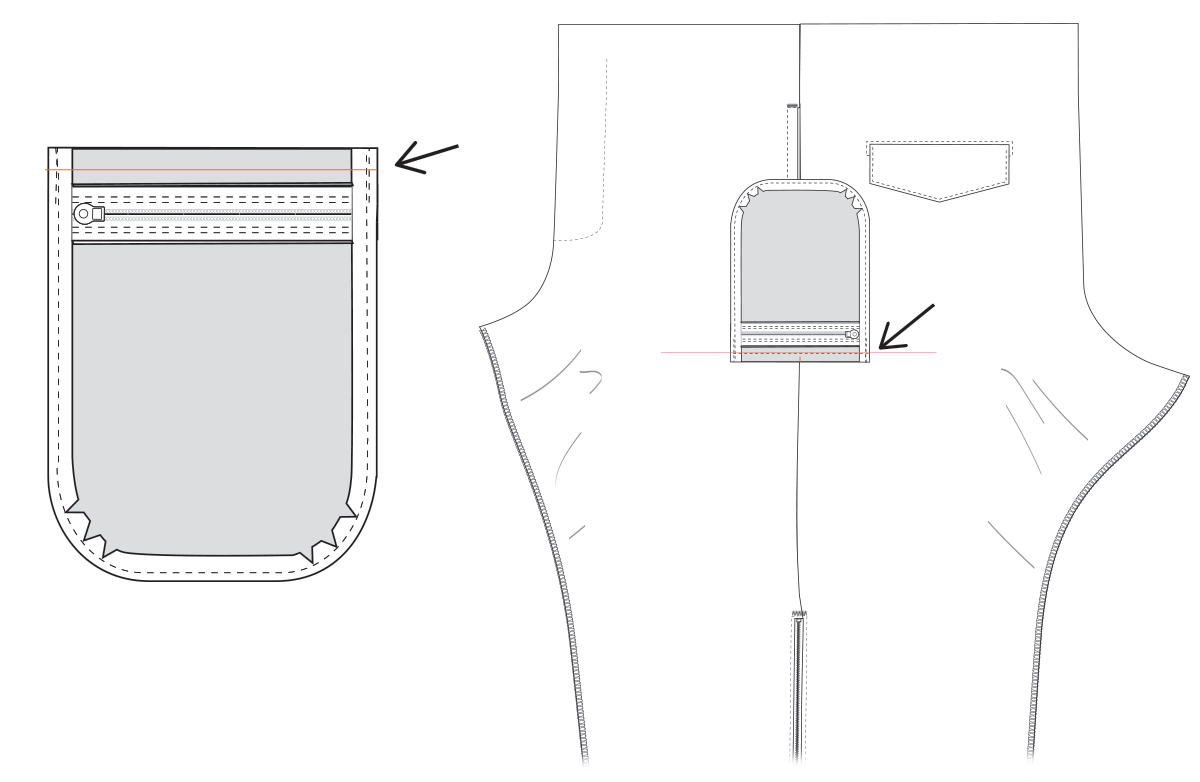
Turn the welt piece through to the wrong side of the back panel, press opening seam flat with iron.
Fold welt piece up from the bottom, matching the fold to the top of the welt opening. This creates the welt. Press the fold really good so it holds.
Sew that fold in place and seal up the sides of the welt opening by stitching along the edge of the triangle bottoms, like the above picture. Flip the back panels over onto the right side, move away the back and pocket bag to expose the triangles. Make sure the welt fold is still in place and has no creases in it before you stitch it down.
Trim sides of welt piece so they don’t stick out of pocket bag when you sew up the sides, about .25 inch (6 mm).
Sew top and bottom of welt piece to pocket bag, .25 inches (6 mm) from edge. Make sure back panel is not under the pocket bag when you do. We are just sewing the welt piece to the pocket bag so it doesn’t flop around inside the pocket bag.
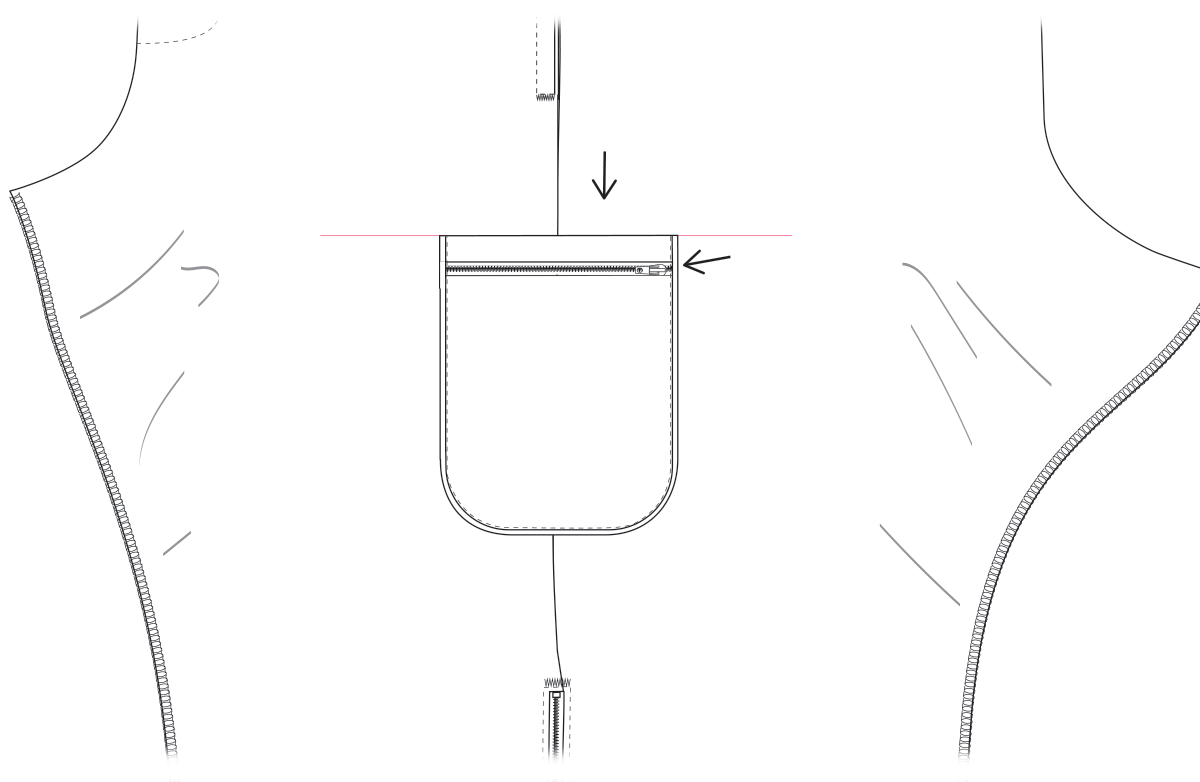
Pin flap out of the way and make sure back pocket bag is not under the welt. Top stitch sides and bottom of welt opening about 1/16 inch (1.6 mm) from edge, stitching sides 3 times for reinforcement, leave top for now. Starting and stopping 1/16 inch (1.6 mm) from top of welt opening.
Fold back pocket bag up and in half, line up the sides and press bottom with an iron. Stitch pocket bag sides closed, 1/8 inch (3.175 mm) from edge.
To finish the back panels sew top stitch on top of welt opening. 1/16 inch (1.6 mm) from edge.
Overlock or zigzag edge of inseam and side seam of the back panels.
Constructing the Front Panels
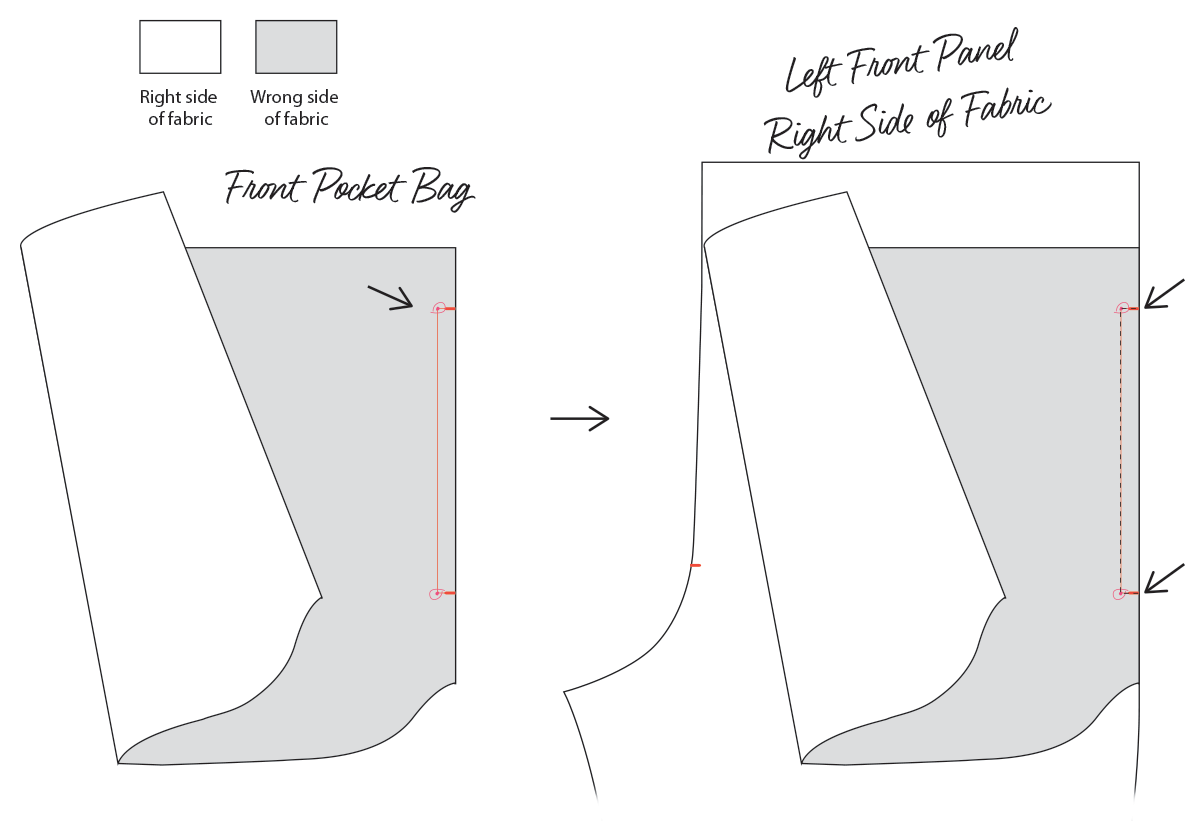
Mark pocket bag 3/8 + 1/16 inches (1 cm + 1.6 mm) from edge where marked.
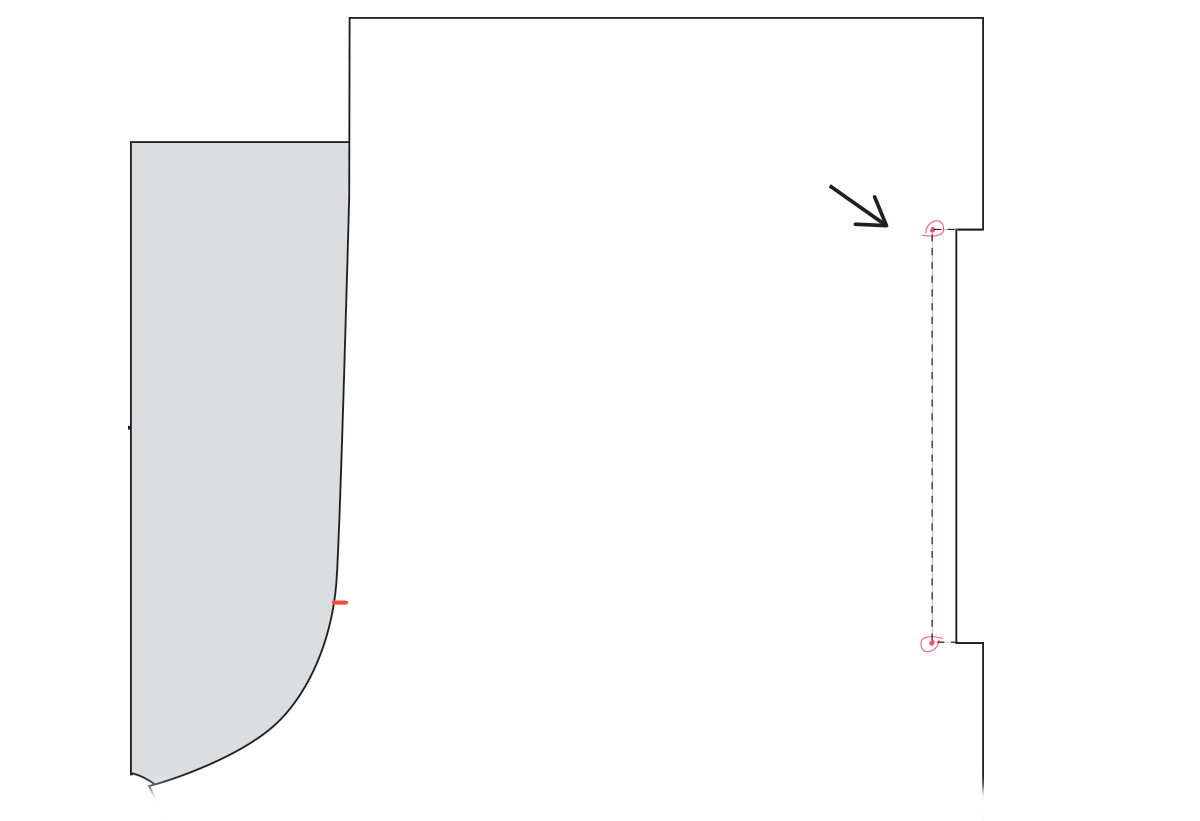
With pocket bag facing wrong side up and left front panel facing right side up, place pocket bag on top of front left panel and line notches up. Sew around markings like the illustration above.
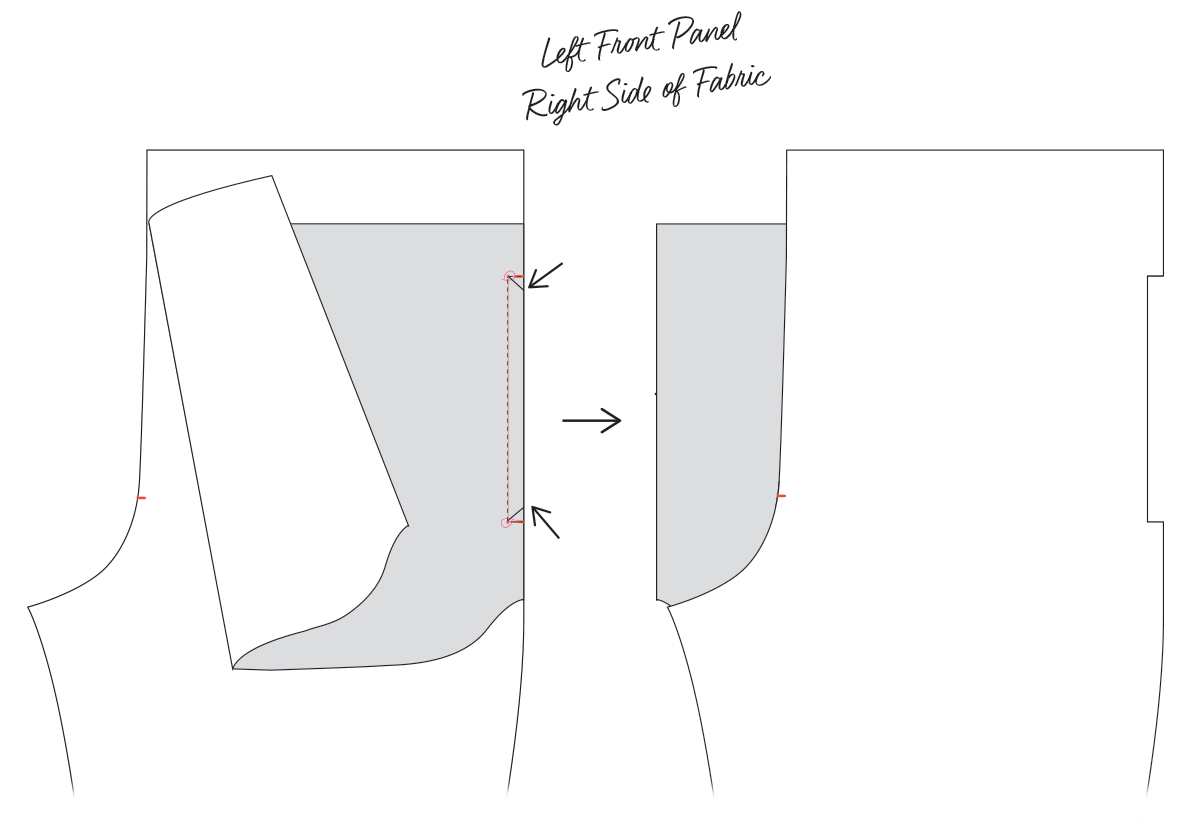
Cut corners and press open the seams.
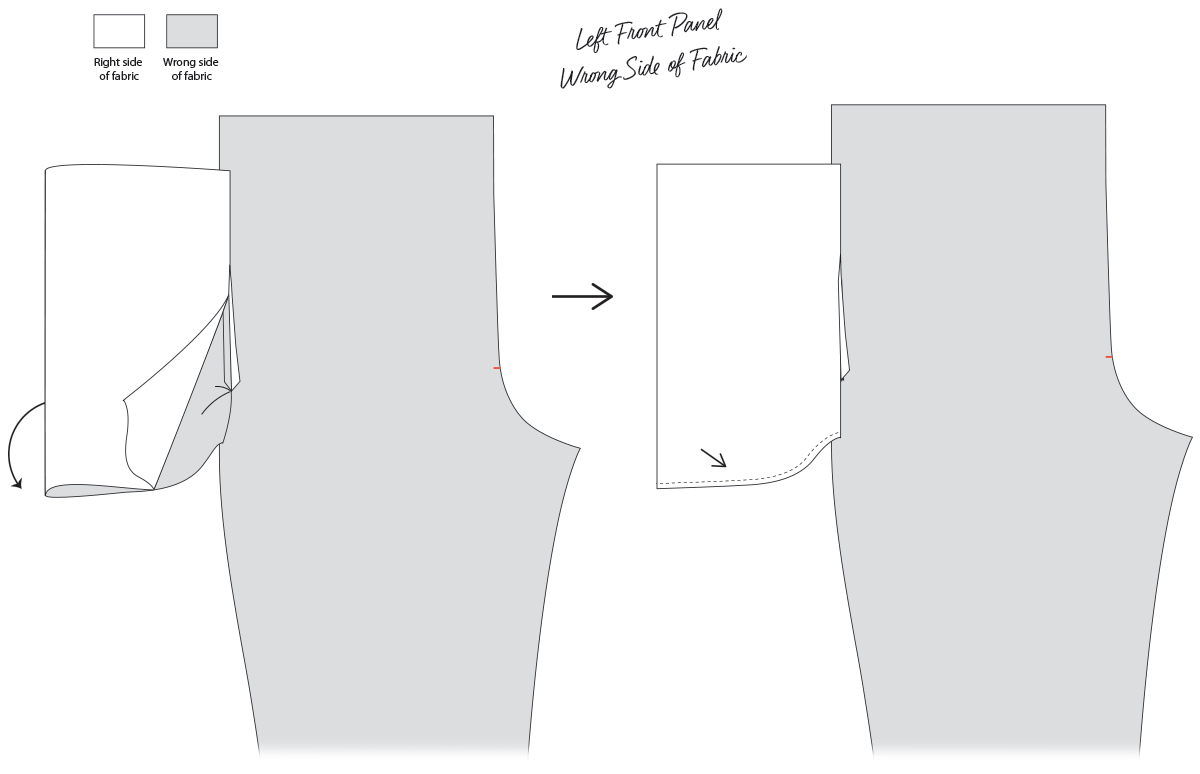
Turn back front pocket bag towards wrong side of left panel and press front pocket opening flat.
Mark 3/8 inches (1 cm) from edge of front pocket opening and sew around the marking.
Turn front panel around to the wrong side, flip pocket bag around and place bottom ends together exactly, sew .25 inch (6 mm)from edge.
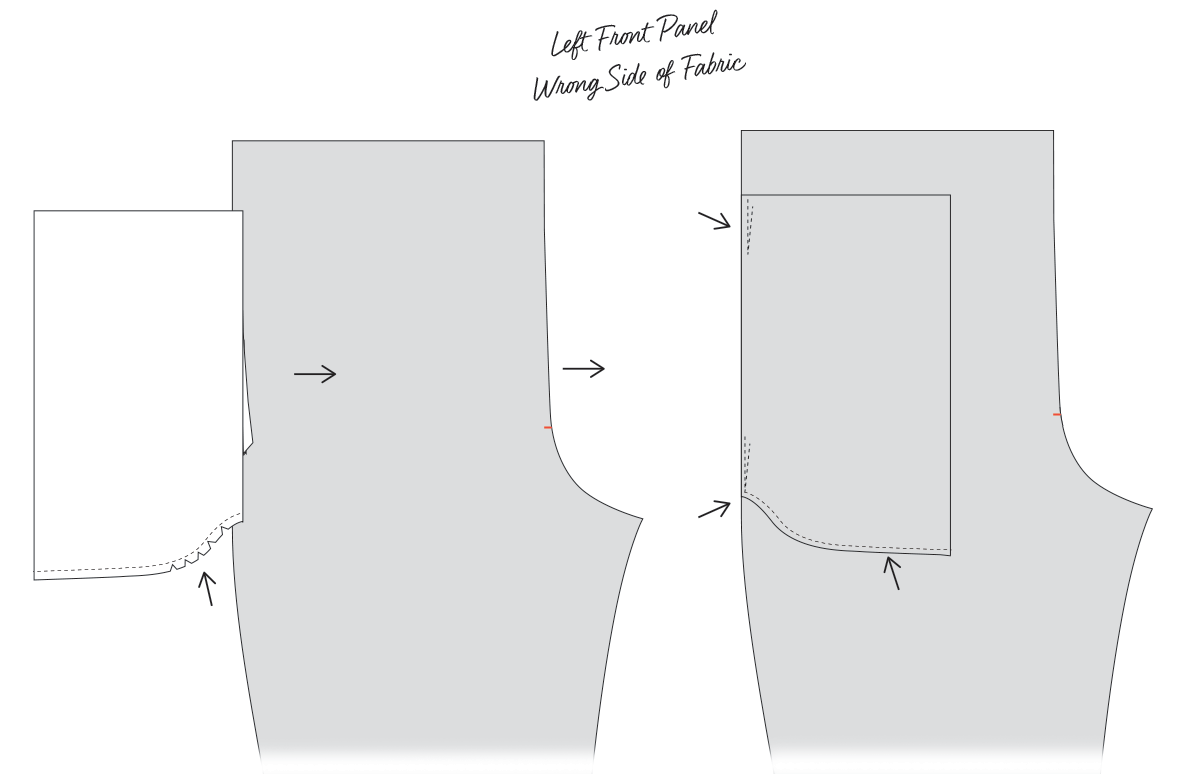
Press open seam, snip curved part of pocket, turn in and press with iron again. Sew bottom of pocket bag edge 1/4 inch (6 mm) from bottom.
Evenly align the pocket bag with the side seam and tack down the pocket to the front panel about 1/8 inch (3.175 mm) from the edge so it doesn’t move around.
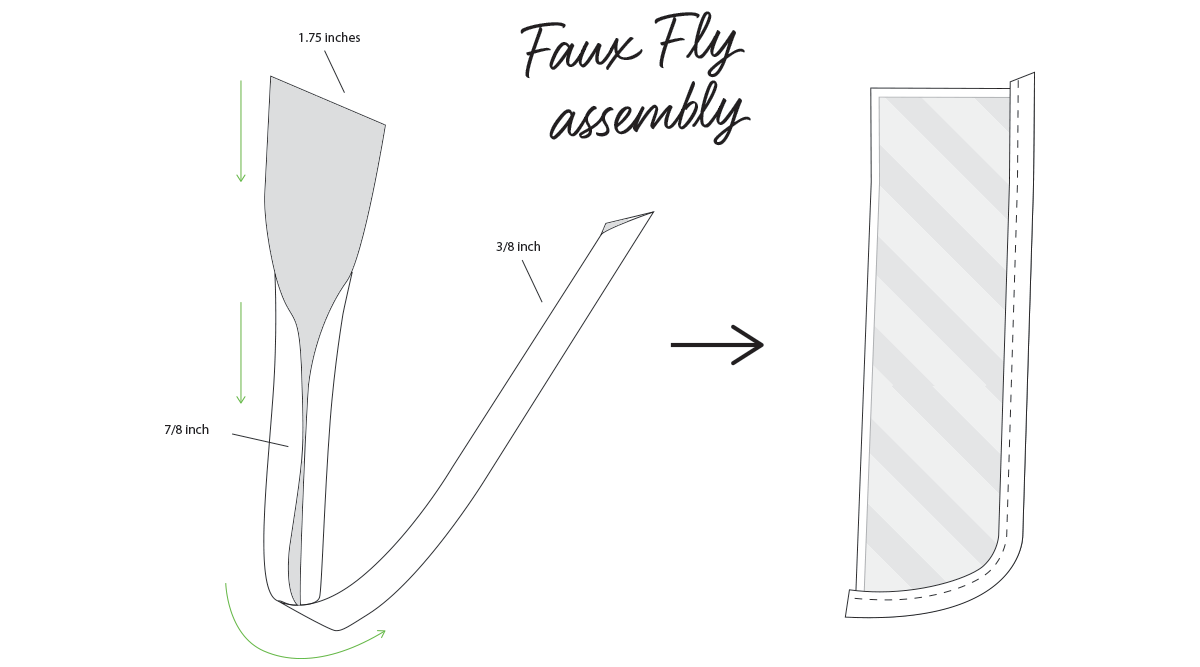
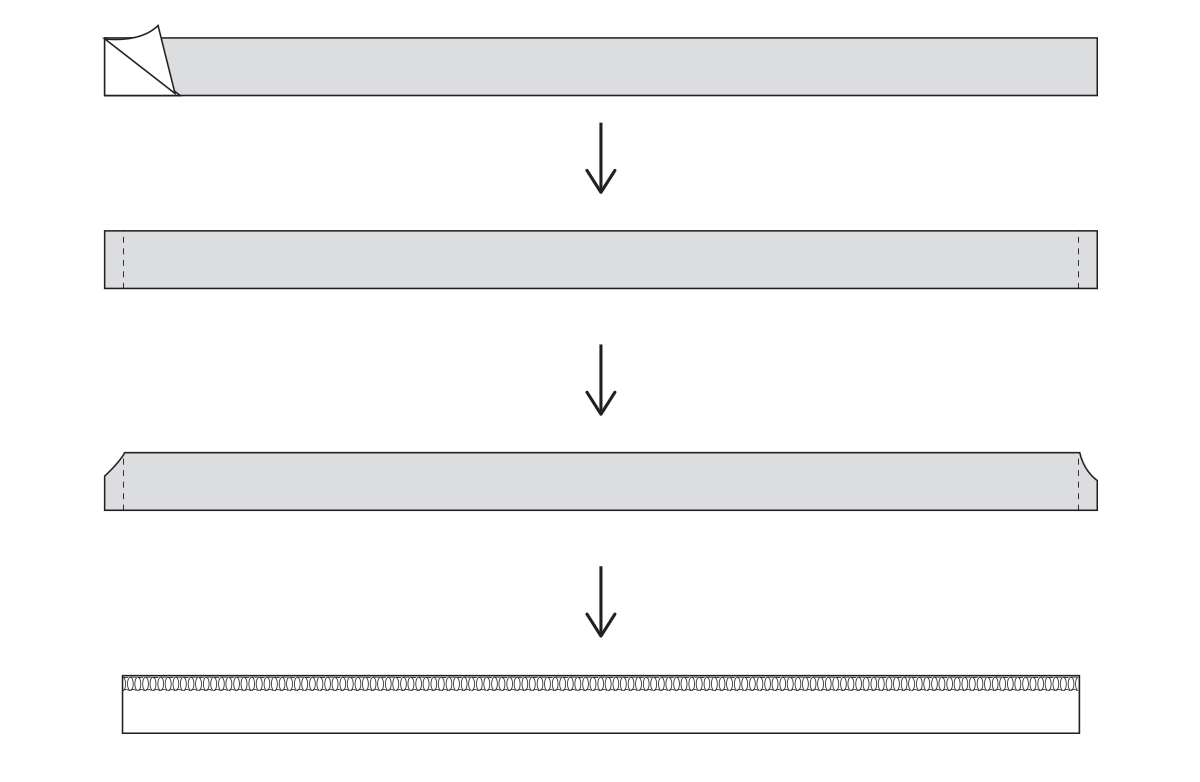
Create bias tape by marking 1.75 inches (4.4 cm) width at a 45 degree angle, about 15 inches (381 mm) in length. Cut out and fold sides over to the center point and then fold again to create a 3/8 inch (1 cm) folded tape, like in the illustration above. If you have a folded bias tape folder to make this with, even better, but it’s not that hard to do by hand.
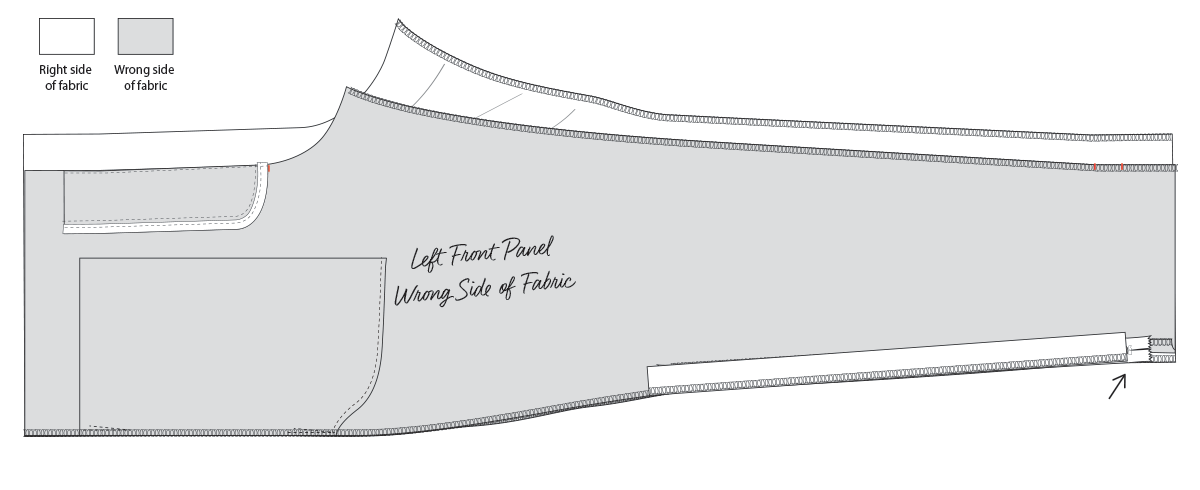
Iron interfacing to faux fly. Sandwich edge of faux fly with bias tape and sew about 1/8 inch (3.175 mm) from edge like in illustration above. Trim excess bias tape.
Sew faux fly onto left front panel. Flip fly and place bottom of fly on notch in crotch and line up with crotch edge. Sew right along the bias tape with a zipper foot. Then sew about 1/16 inch (1.6 mm) from crotch seam to stop fly from flapping around.
Overlock inseams and side seams edges of both front panels.
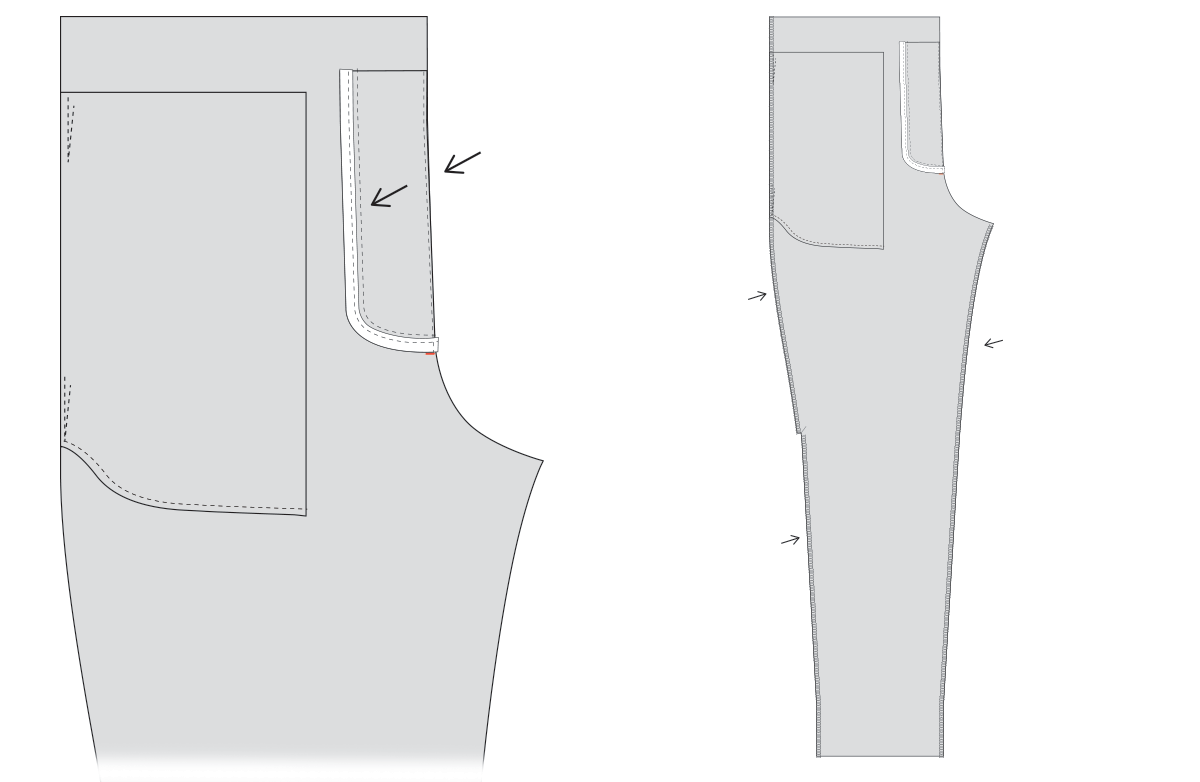
For the ankle zipper, you need an 18 inch (45.72 cm) #3 closed end nylon zipper. First check to see that the zipper you have purchased will fit. Not all zippers are actually 18 inches (45.72 cm). Place the zipper stops on the pants pattern and see if the stops end with the notches. You may have to move the end zipper stop up or down to make it fit. All you have to do is pry the prongs up holding it down and slip it out and reposition it and insert the prongs in and clamp them back down using an awl or somethng.
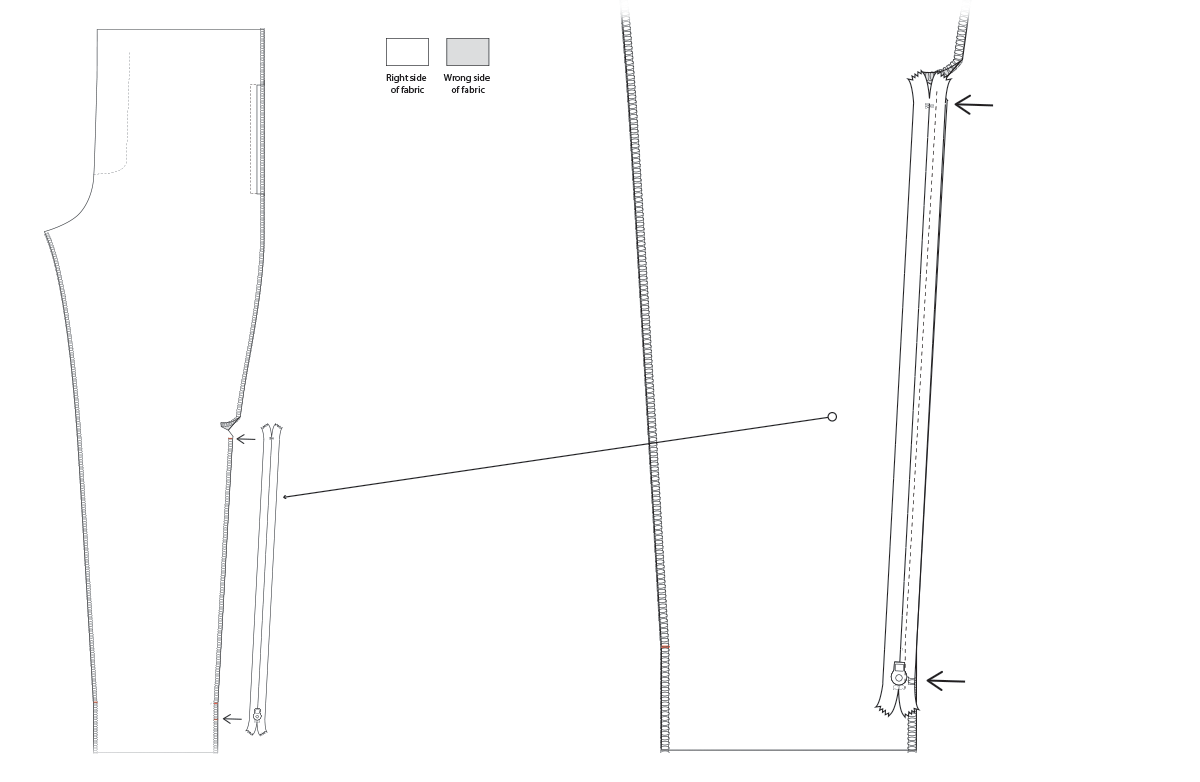
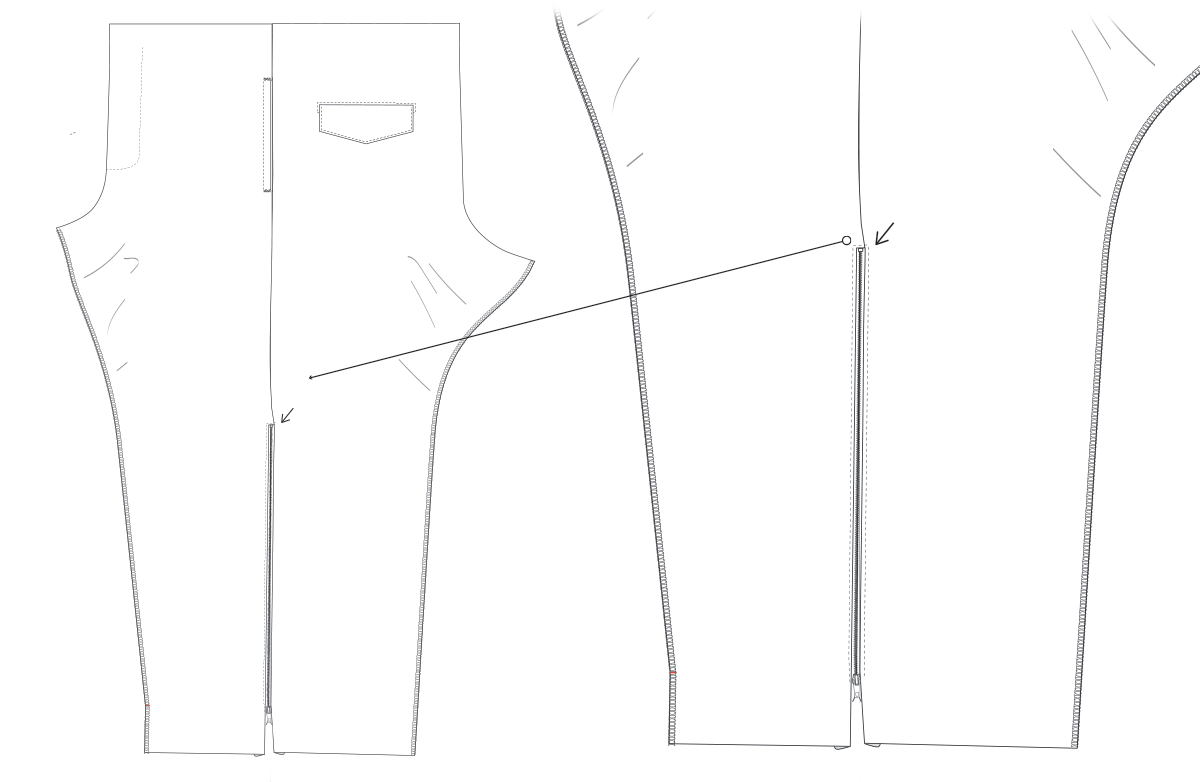
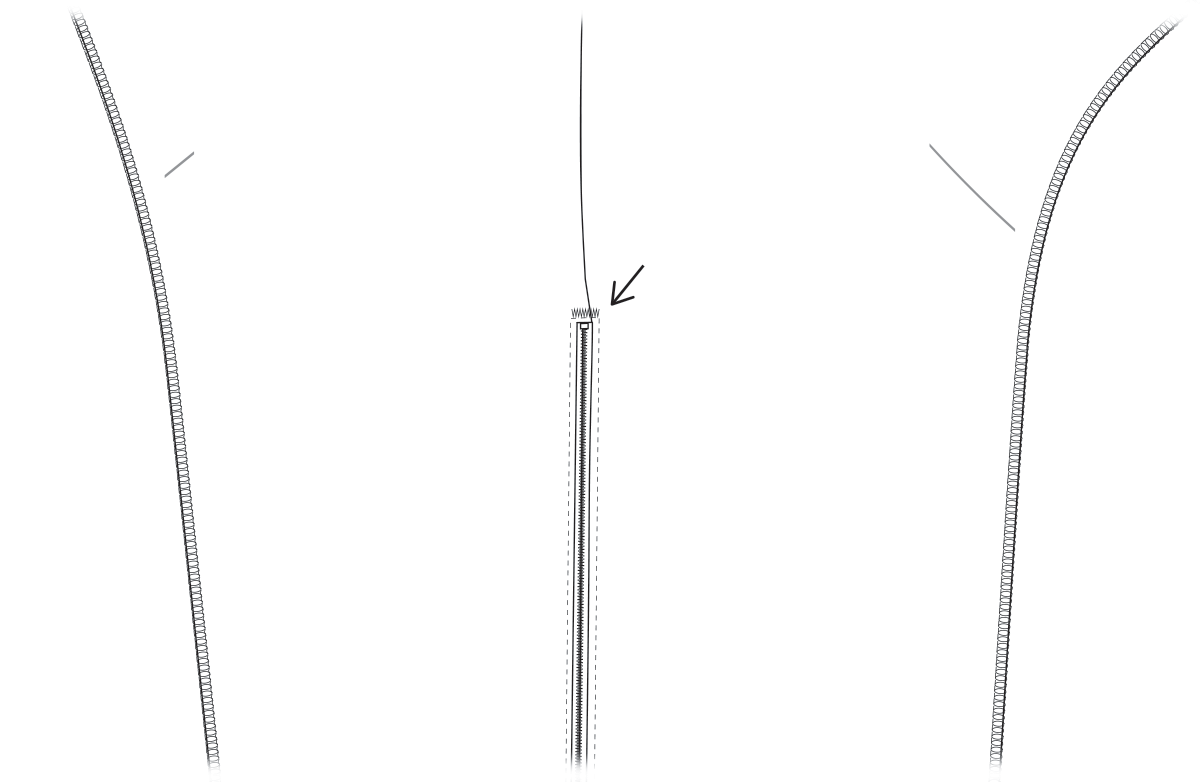
Now that you have a zipper that will fit…On left panel first, right side up, with zipper upside down and face down, line up zipper end stop with last notch at ankle, pin or hold in place with those sewing clips. Now that the zipper is held in place sew zipper down with zipper foot, getting close to the edge of the zipper. You can turn it around and sew it on the other side if you prefer, doesn’t matter. Just as long as you get close to those zipper teeth and don’t leave too much of a gap.
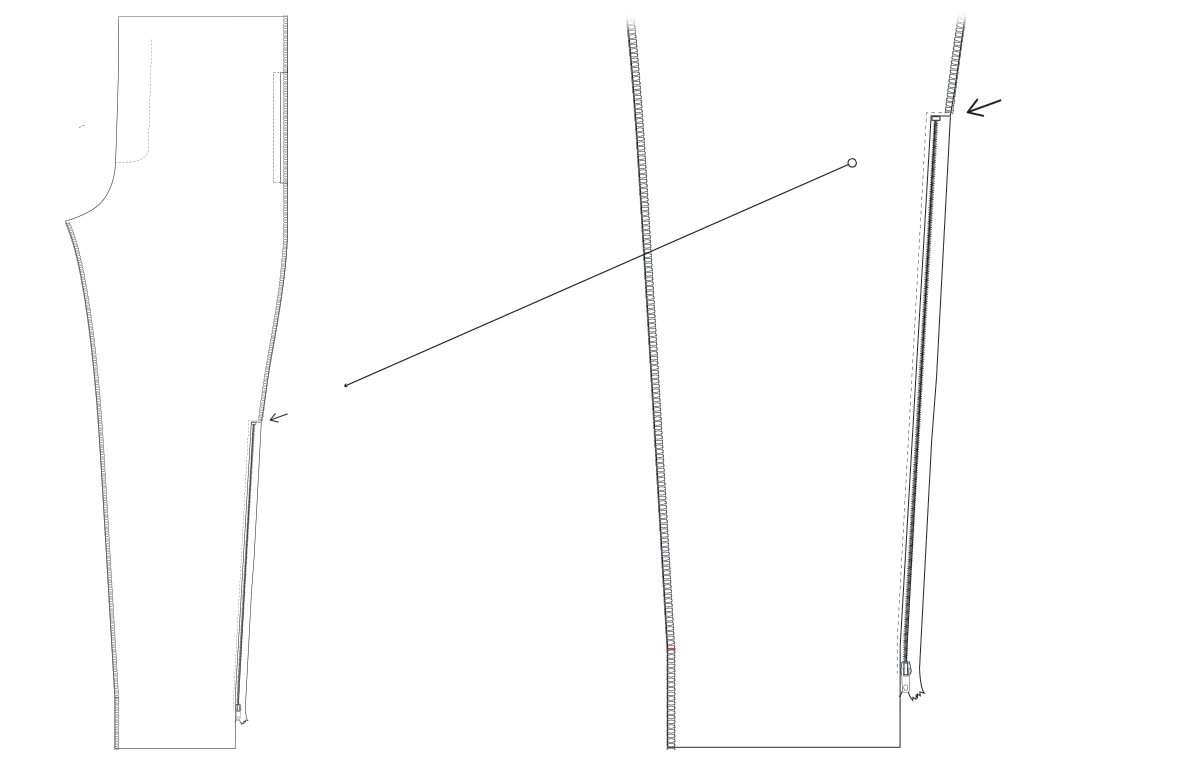
Press around zipper to open the seam. Turn small seam at the top of the zipper under and create a nice even seam, hold it in place with some double sided basting tape. With a zipper foot, Sew around top and length’s edge, about 1/8 inch (3.175 mm), like in the illustration.
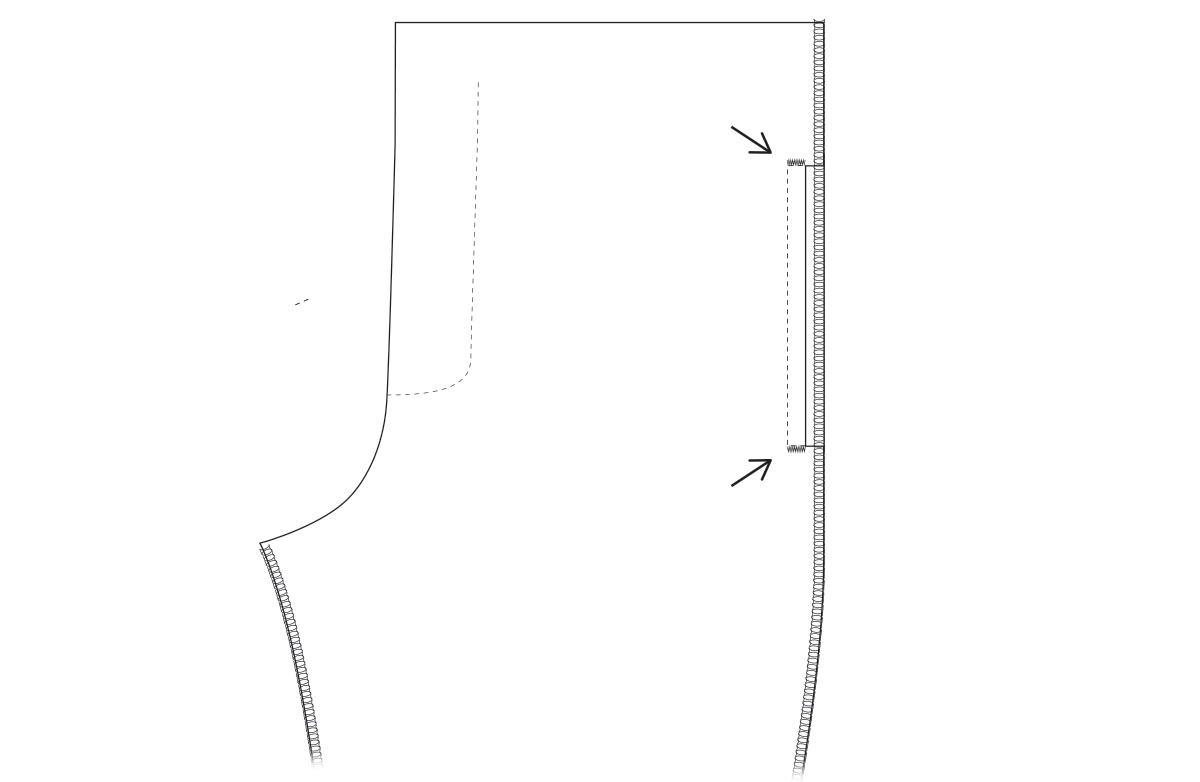
Bartack the front pocket with a zigzag stitch. Set zigzag width to 2mm and length close to zero. Zigzag above and below the stitching like in the illustration above. It makes it easier to mark where the stitch will end and begin with a tailor’s pencil.
Finishing the pants
Make the zipper facings. Fold them in half. Mark 3/8 inch (1 cm) seam allowance on ends.
Stitch ends.
Trim corners.
Turn and finish turning corners with a bone folder. Press with iron. Overlock raw opening closed.
Join side seams to fronts and backs. For left side, first lay down back facing right side up, then lay left front, wrong side up on top of that, lining up side seams. Now place zipper facing on top of this. Zipper facing starts just above zipper stops at the ankle. Pin or clip all of this together at the side seams.
First, using zipper foot. Sew zipper at side seam. Sew with zipper side facing down, otherwise it’s too bulky and you can’t get close to edge of zipper teeth when you sew. It’s a good idea to mark the zipper stop on this side, so you know where to start sewing. Start sewing at the zipper stop at the ankle and sew until you get to the end of the zipper, the zipper fabric, not just the zipper stop. Now put regular presser foot on and sew the rest of the side seam, 3/8 inch (1 cm) seam allowance. Press side seams open.
Sew top stitch on other side of ankle zipper. Start at the top of the zipper’s top stitching to the zipper stop at the ankle, sewing about 1/8 inch (3.175 mm) from zipper teeth.
Bartack top of zipper. Make bartack about 3/8 inch (1 cm) wide. Do zigzag and set width to 2mm and length close to zero, to match the front pocket bartacks.
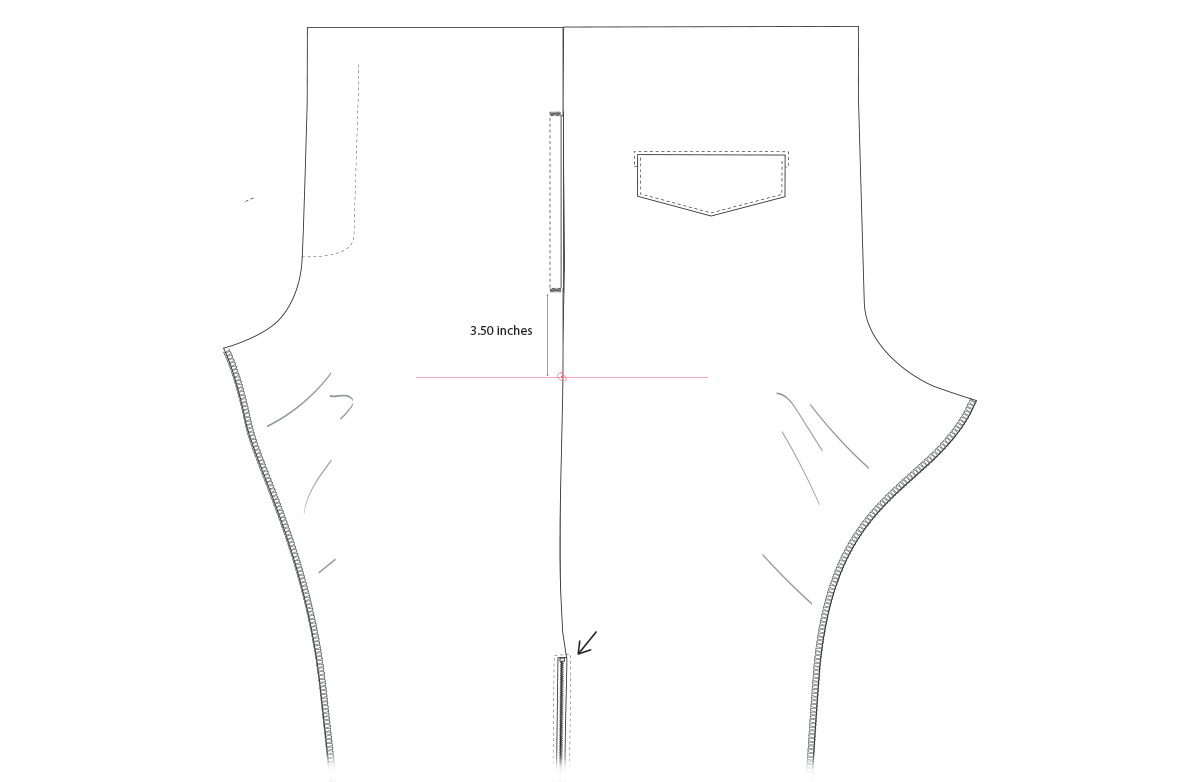
Pin front pocket bag end out of the way so you don’t sew it when sewing the side zippered pocket on. Mark where the zippered pocket goes. Measure 3.50 inches (9 cm) from bottom of opening on the front pocket, make a mark. Then square a line from the side seam on that mark.
To make your bias tape for the piping you need atleast a 20 x 20 inch (51 X 51 cm) square of fabric. First, draw a straight line at a 45 degree angle in the center of the square of fabric. Then with a c-thru ruler, using the first line as a guide, draw a second line 1 inch (2.5 cm)out from that line and repeat. Cut out and fold in half, with the .25 inch (6 mm) traverse cording in the center. Sew in with a zipper foot, getting as close to edge of the cord as possible, like in the illustration above.
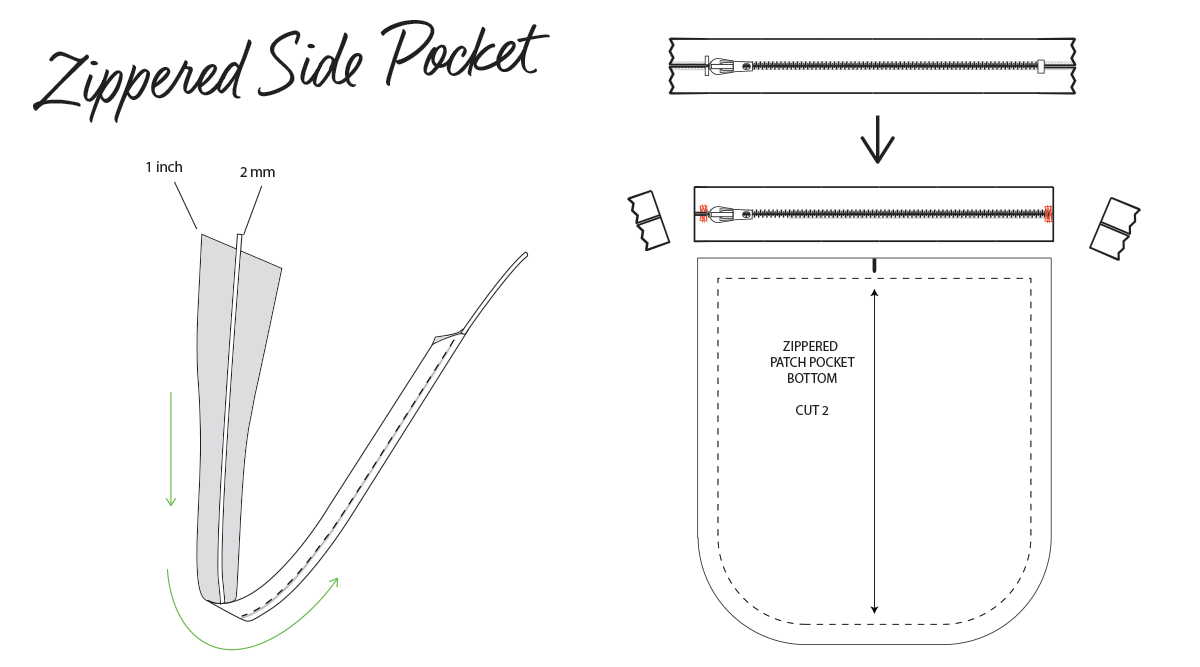
For the zipper you need a 6 inch (15 cm) #3 closed end nylon zipper. The 6 inch (15 cm)zippers for these side pockets will need to be adjusted. Use the zippered pocket pattern to mark where you are going to cut new zipper ends. With heavy thread sew around the zipper teeth many times to create new zipper stops and take the old metal ones out by unprying the backs with an awl. We have to remove them to be able to sew, otherwise the needle and presser foot would hit the metal stoppers.

First we will make the side pocket for the right side. To insert the zipper into the side pocket, with bottom piece of side pocket, right side up, place zipper face down with zipper closing towards the right, line the edge of zipper tape up with the top of the pocket piece, like in the illustration. Keep this together and turn over and stich with zipper foot, sewing close to the zipper teeth and then again 1/8 inch from that stitch, for reinforcement. Turn back over and flip zipper up and press with iron.
Next, Lay top pocket piece on top, wrong side facing up, lining up with edge of zipper tape. Sew close to the zipper teeth and 1/8 inch again from that stitch to reinforce. Turn up and press with iron.
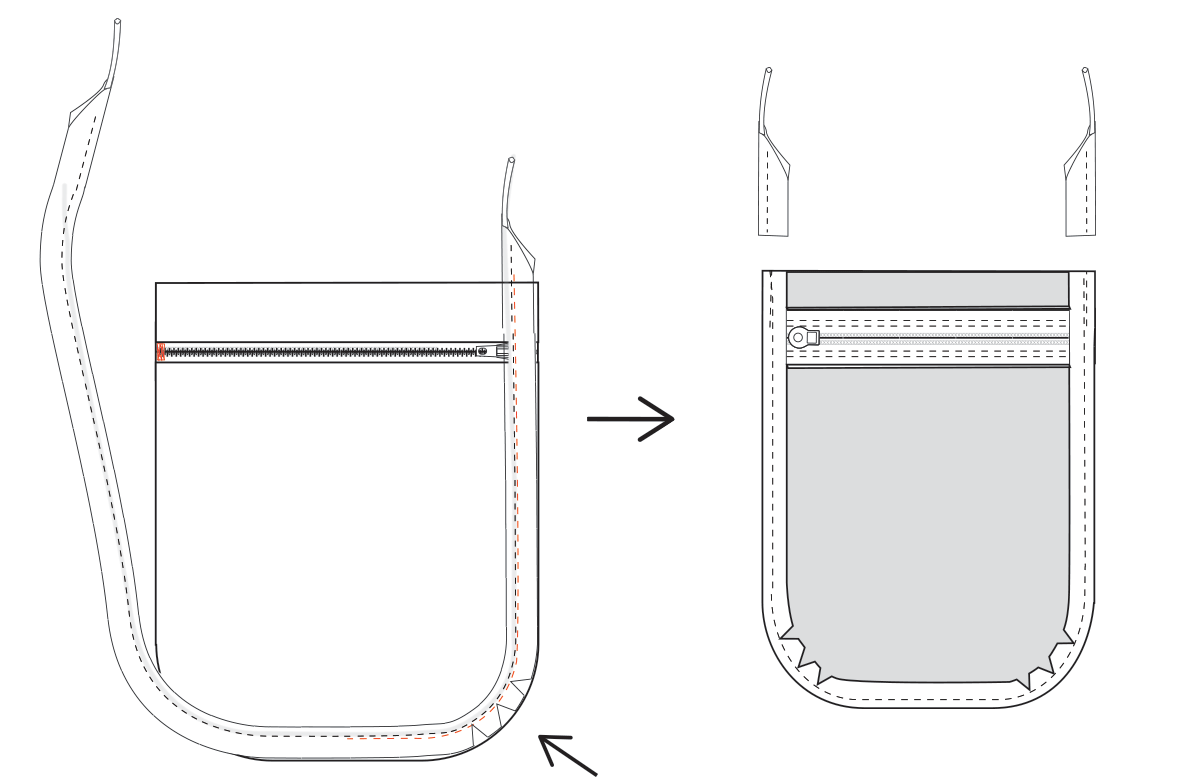
With a zipper foot. Pocket facing up. Sew piping on by meeting the edge of the piping with the edge of the pocket, sewing close to the edge of the piping cord. When you get to the curves at the bottom clip triangles into the piping tape so the piping bends more smoothly. Trim excess piping away. Press the piping edge back with an iron.
Measure 3/8 inch (1 cm) seam allowance from the top (raw edge) of the wrong side of the pocket with a c-thru ruler. Turn upside down and line up with the pocket placement line we squared earlier, making sure to get the pocket in the center of the side seam. Stitch across.
Flip pocket over to right side and center bottom with side seam. I like to stick some double sided basting tape on the back so it doesn’t move around when I’m sewing it down. Thing to think about before you sew down the pocket, check to see that the side seam is laying flat, and split, if that makes sense. We don’t want that seam to become bulky by it flopping over to one side. Refer to the next illustration below to see how that should look. Now, with a zipper foot, starting at the top, using the piping edge as a guide, sew the pocket down getting as close to the edge of the pocket (don’t sew onto the piping) as you can.
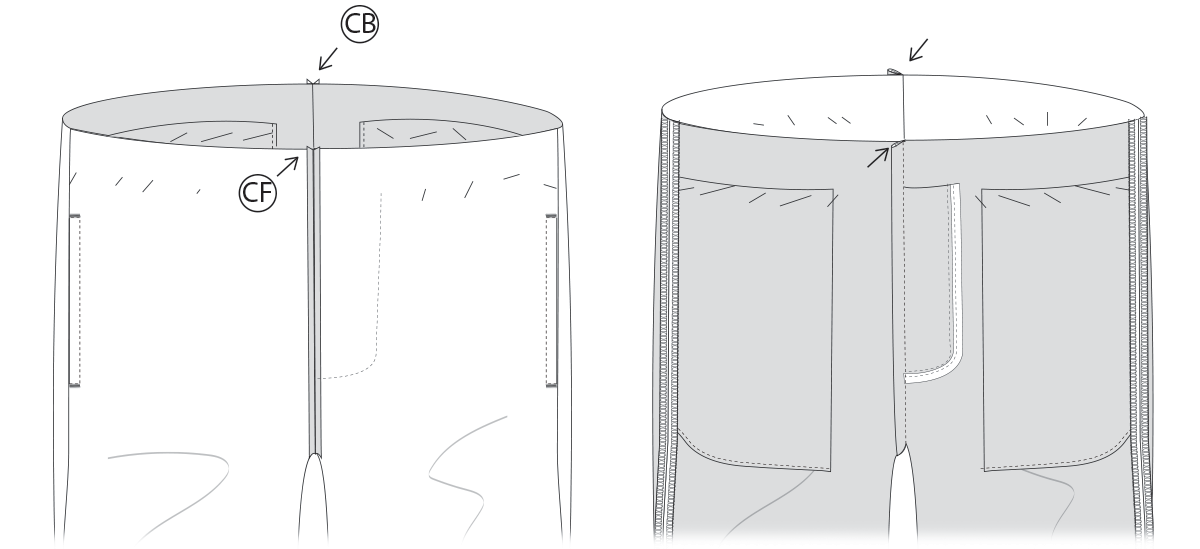
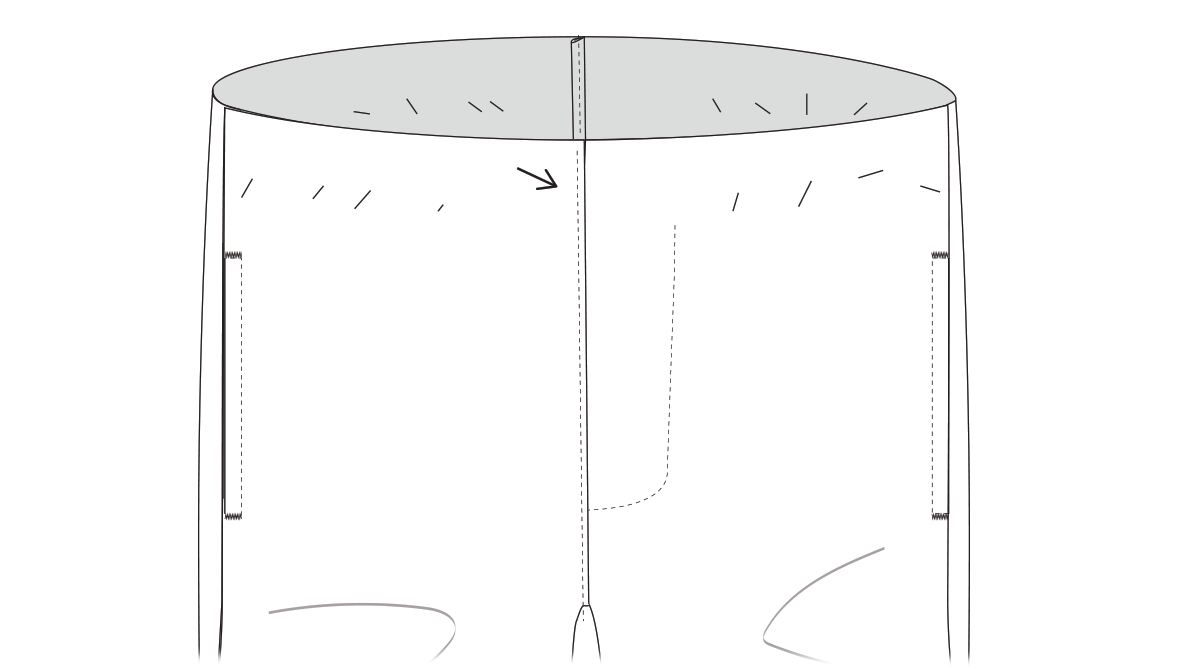
With thread and needle baste front and back pocket bag raw open tops down so they don’t shift around when sewing the waist elastic in.
Pin or clip together inseams on each side making sure knee notches line up. Sew together with 3/8 inch (1 cm) seam allowance. Press open the inseams with an iron. Turn so they are right side out.
Clip or pin together at the center front and back, lining up back and front notches and the inseams. We are going to join the legs with a french seam. This will keep the most intimate area of the pants free of any rough serged seams. First sew .25 inch (6 mm) seam. Trim away any bulk where the inseams meet. Press open seam.
Turn out to wrong side and close up that .25 inch (6 mm) seam allowance with 3/8 seam (1 cm), finishing the french seam. Press seam.
Turn right side out and press that seam flat on the outside, making sure the french seam is pointing away from the Left side. Top stitch the french seam down 1/16 inch (1.6 mm) from edge. Compensating foot is great to have for this part.
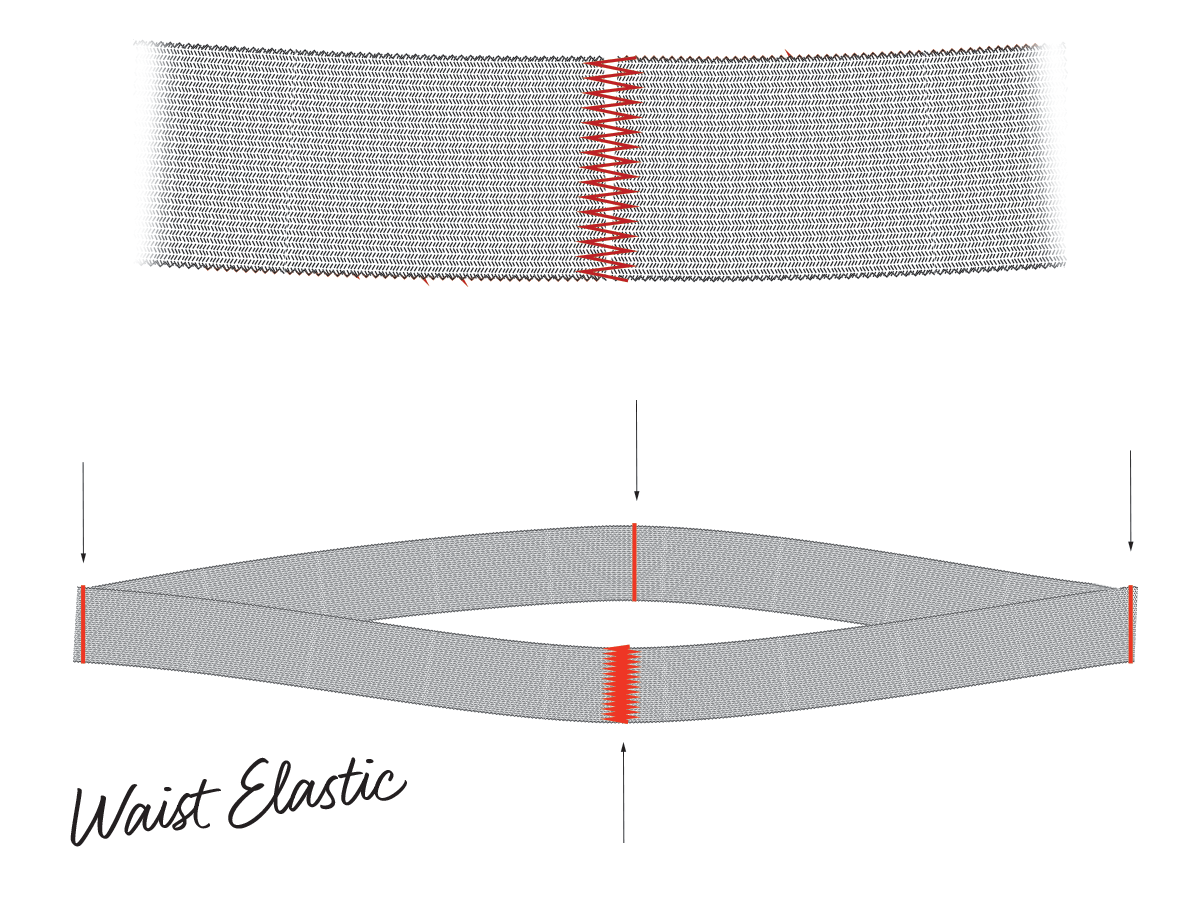
Sew a zig zag to connect the elastic ends together on the waist elastic forming a loop. Starting from the zig zagged end, fold in half and mark the opposite end with a tailor’s chalk. Square a line down. Now line up the zig zag end and the line you just made to determine the next 2 lines to mark and mark them. Square lines down. Now the elastic is sectioned into 4 equal sections.
We are going to join these 4 marks with the center front, center back and side marks and stitch them down in place. This will do two things, tac the elastic in place and keep the elastic evenly distributed around the waist as it’s sewn in.
Make sure marks are turned to the outside on the elastic so you can use them to line up the front/back center and side elastic lines. Start with the zig zag end, that lines up with the center back seam. Then sew the front the same way. Next the side lines. This stitching can be removed later, but I don’t bother, they are hidden within the ruffles of the elastic when it’s finished anyway.
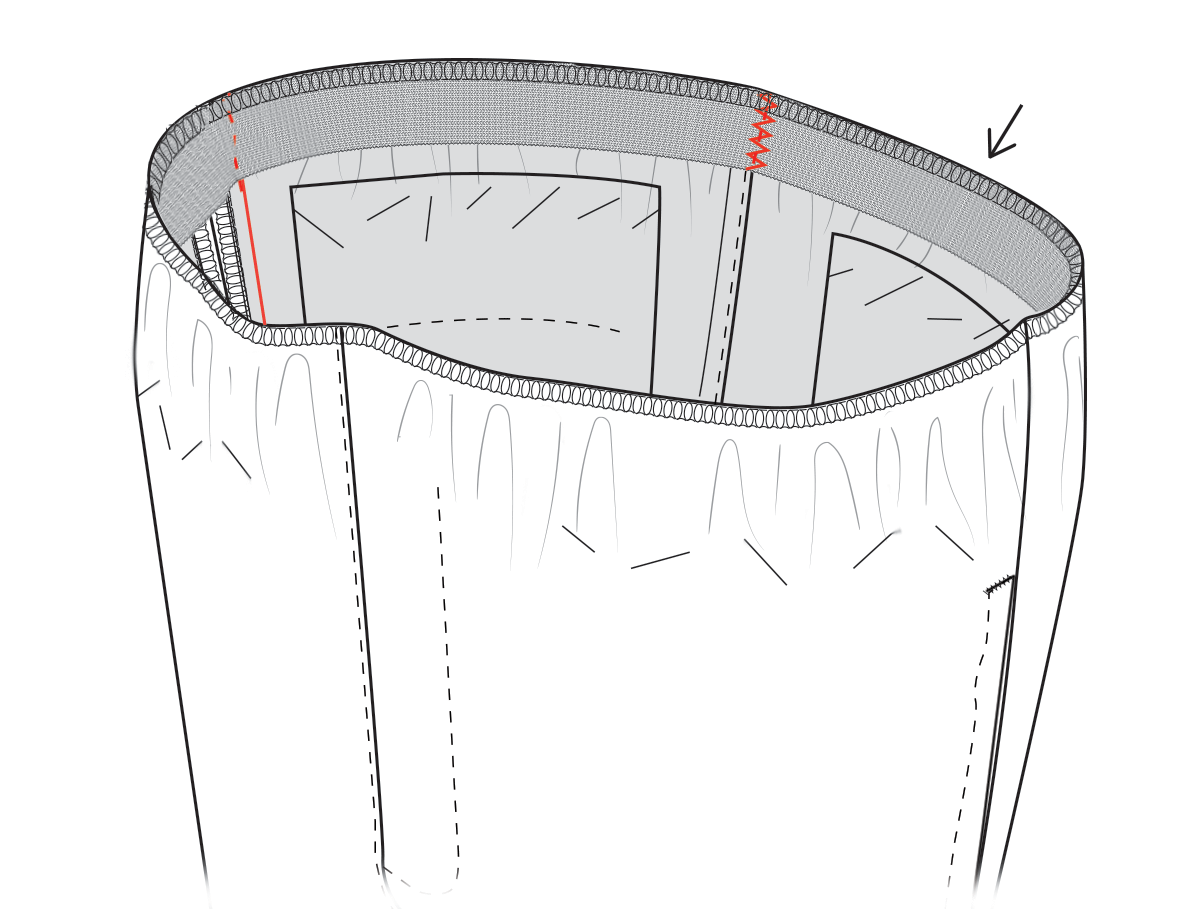
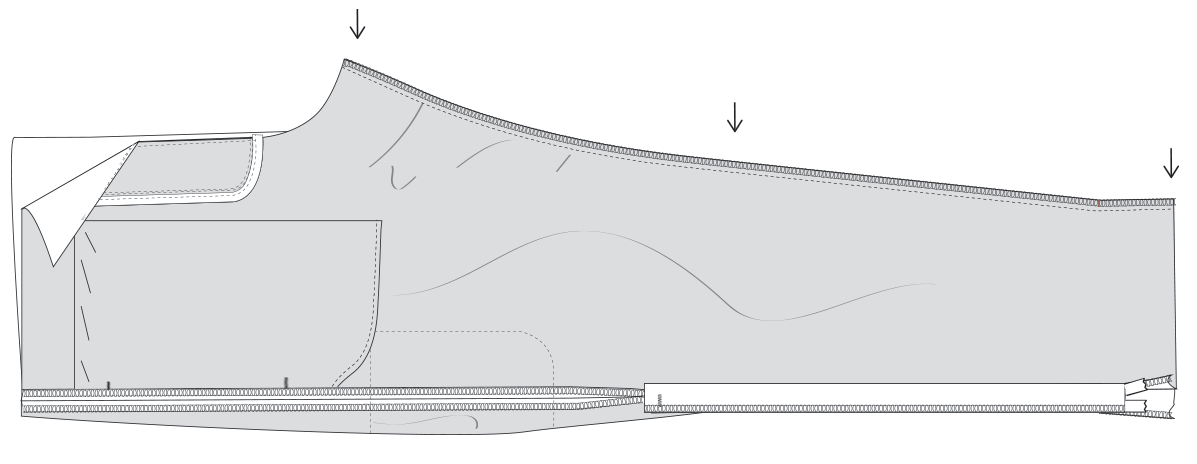
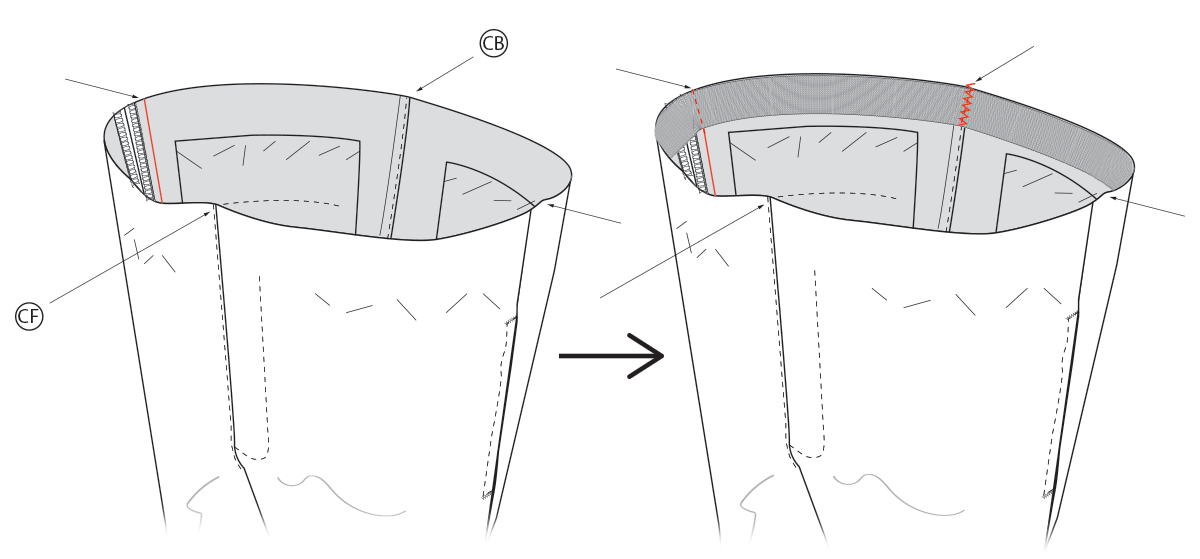
Line up raw edge on top of waist and elastic and serge or zig zag together at the top. This holds the elastic in place as well as gives that edge a nice clean finish. Do one of the 4 sections at a time, stretching the elastic out with the fabric each section.
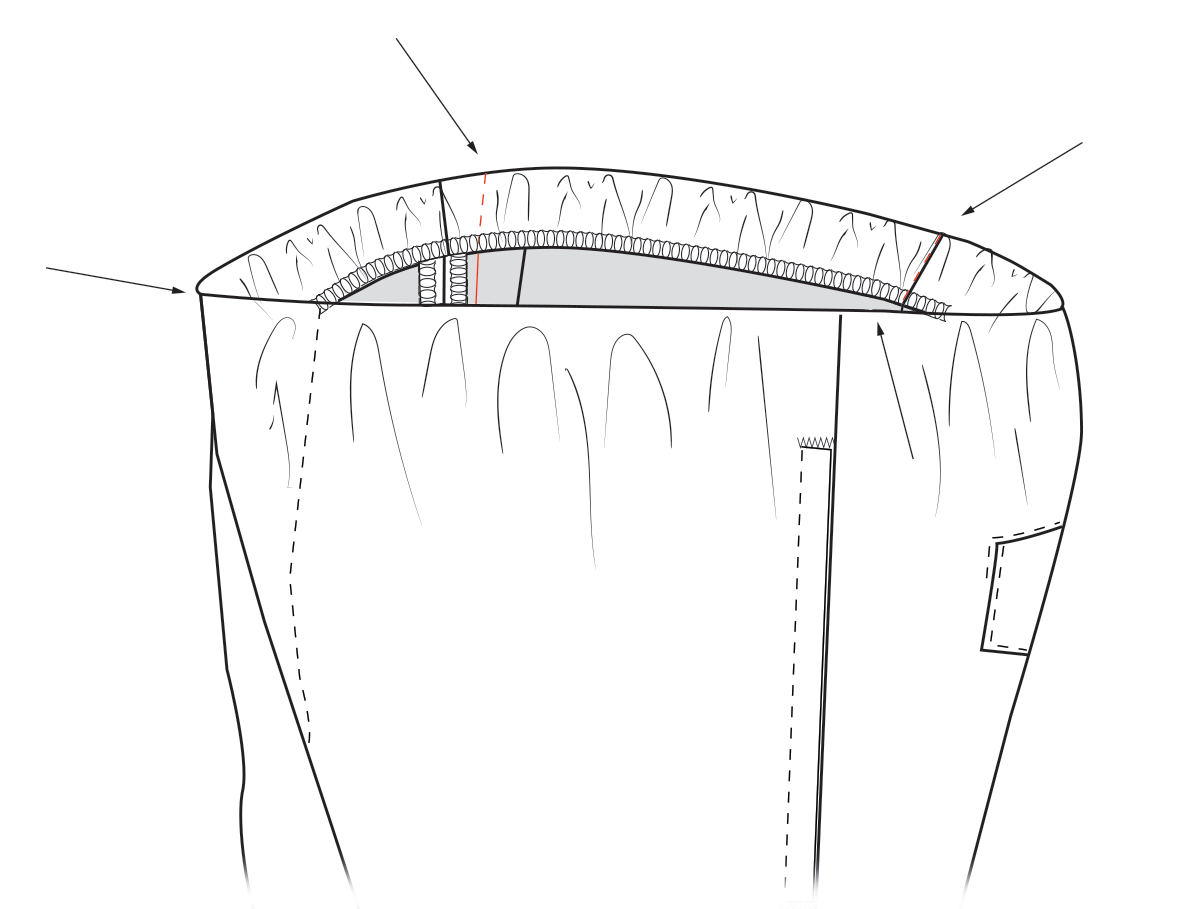
Fold over waist and elastic, 1.50 inches (3.8 cm), width of elastic, and sew the 4 corners down again. Making sure you push the top of the elastic to the top of the fold and also making sure to line up the seams and markings as you did the first time.
NOTE: If you are putting labels in the waist, don’t forget them here.
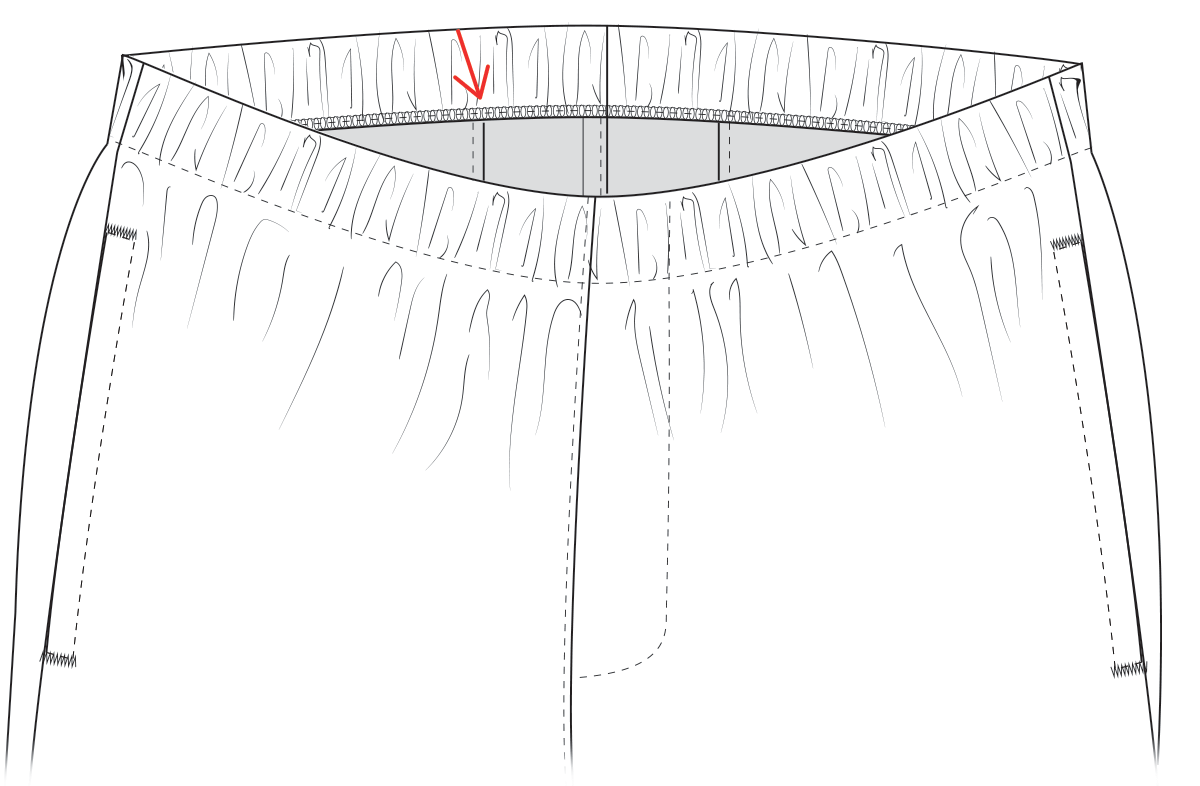
Set stitch length to 3 to 3.5. Sew elastic down , around the bottom, 1/16 inch (1.6 mm) above the bottom edge. Stretching out 1 section at a time as you go. Stopping to rest at the end of each section with your needle down. A 1/16 inch (1.6 mm) compensating foot is great to have on this part. Also, be careful that you sew the pocket bags flat. The edges of them can get caught on the presser foot and bunch up during this step. Now you can take out the basting around the waist that was holding the pocket bag edges in place.
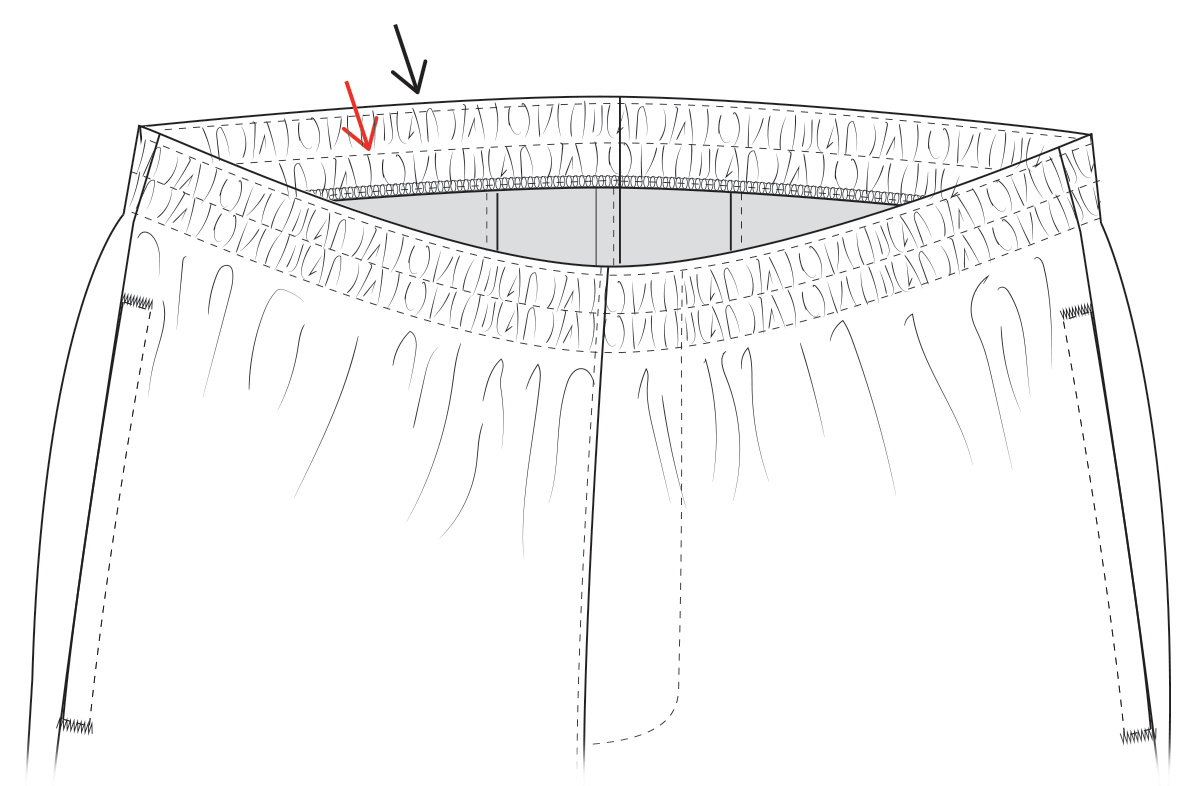
Sew 1/8 inch (3.175 mm) from the top edge all the way around, again a 1/8 inch (3.175 mm)compensating foot helps a lot on this part. The top may look a bit wavy, don’t worry we will fix that with the iron later. Last, sew the elastic down the middle, have right side turned up this time so you can see the last 2 stitch lines, to gauge the middle by eye.
Place the elastic waist around an ironing board and steam iron the elastic flat and steam out any waviness. The steam will help the elastic shrink and snap back. But BE CAREFUL, if you are using synthetic fabric, it can easily melt the fabric. Test your iron setting on a scrap piece of fabric first to make sure your iron isn’t too hot.
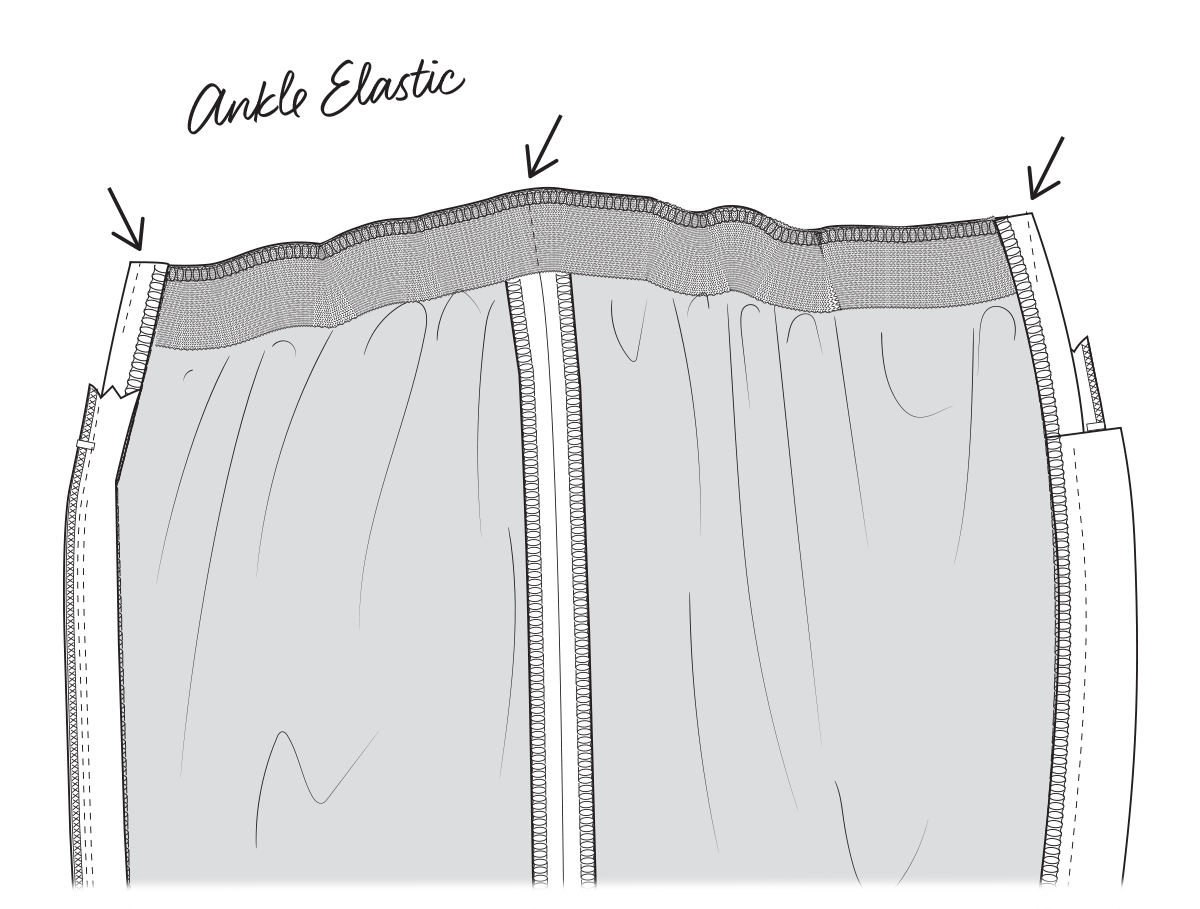
Unzip the ankle zips all the way. Take the ends and tuck the elastic ends under the seam allowance at the end of the ankles. Sew 1/8 inch (3.175 mm) from each end, making sure to catch the elastic. Sew once up, back down again and up again. Stretch out both ends using both hands to keep it stretched out, while holding it out, making sure the raw edge of the ankle is in line with the edge of the elastic, sew down at the inseam, making sure that the inseam is flat, and not all to one side. Overlock or zig zag along the raw edge like you did with the waist, lining up the elastic with the raw edge of the ankle, stretching out 1 of the 2 sections at a time, stopping to rest with your needle down to hold it in place.

Fold ends over twice, lining up zipper tape with edge, sew down 1/8 inch (3.175 mm) from edge, being careful not to hit the zipper stop, sewing up, back down and up again. Stretch out with both hands and sew at inseam. Again checking to see that the inseam is flat and elastic is at top of fold. Sew down open end of elastic by putting needle and presser foot down at one end, sew along, 1/8 inch (3.175 mm)from the edge (A compensating foot is good for this part), stretching the elastic flat, until you get to the other end. Don’t go past the onto the zipper tape or coil. Stop before you get to that.